
Export from WordPress
Export from WordPress
If you are using your WordPress, you can also get an export of your posts, pages, comments, custom fields, categories, and tags.
The WordPress export is great for grabbing the content of your WordPress site so that you can import it into another WordPress host, such as WordPress.com or WordPress.org.
Note: Exports do not include plug-ins, or other site customizations.
Exporting
From the Dashboard navigate to Tools>Export
The screenshot below shows how to export all of your posts, pages, comments, custom fields, terms, navigation menus, and custom posts. However, you can also export just certain posts, pages, or media.

This export process generates an XML file of your blog’s content. WordPress calls this an eXtended RSS or WXR file.
Note: This will ONLY export your posts, pages, comments, categories, and tags; uploads and images may need to be manually transferred to the new blog. If possible, do not delete your blog until after media files have successfully been imported into the new blog.
Importing
Once you have exported your posts, pages, etc., you can import them into your new WordPress site.
- Login to your new WordPress.com or self-hosted WordPress site and go to the Dashboard. From there navigate to Tools>Import and click on the link to “Run Importer“

- Next you will see a screen that prompts you to upload the WXR (.xml) file you generated through the export process. Browse to your exported WordPress archive and then click the “Upload file and import” button.

- Choose and upload your file. You will then be prompted to assign an author to the posts that you are importing. You can use this function to assign one author to all posts, or you can manually set the author for each post in the posts menu. Unless you have a space limit, you will also want to select the option to “download and import file attachments” before clicking the “Submit” button.

- When your import is complete, you will see a confirmation screen.

Your exported content is now added to your site. If you had posts on your site prior to importing, those posts are still available.
Because the export did not include themes or plug-ins, you will need to reinstall those separately from the export/import process.

Unlock Your Domain
Unlock Your Domain
This article only if you own your own top-level domain. If you have been using the free subdomain option with buffscreate.net through CU Boulder, this does not apply to you.
Similarly, if you’re migrating your content to Reclaim Hosting, this article does not apply to you.
Transferring a domain you already own is not too much different from registering a new domain, except the transfer process requires an EPP code, or an agreement code between your old registrar and your new registrar that allows the release of your domain. Your new registrar will have information on how to transfer in a domain. When you start that process, you will be prompted to enter your EPP code.
How to find your EPP Code:
- To get started you’ll need to login to your control panel (http://buffscreate.net/dashboard) using your Identikey username and password.
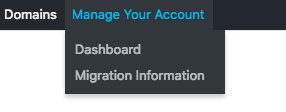
- Once you’re logged in, you’ll see the cPanel interface. Now click on the Manage Your Account menu at the top of your screen and select Migration Information.
- Click the Lock button to unlock your BuffsCreate account.
- Click Get Code. Once that’s done, the system will send you an email with your EPP code.
At this stage, here are a few items to note:
- You’ll receive a series of emails from both your old and new registrars asking you to authorize the transfer. Please act on every email you receive in a timely fashion– even if the emails look like duplicates.
- If you do not authorize the transfer in a timely fashion, the domain transfer will expire and you will need to start over.
- The domain must be older than 60 days.
- The domain must have no other transfers in the last 60 days.
- The domain transfer process can take up to a week, depending on how fast your registrars work.
- Once the domain transfer completes, you’ll receive a notification.

Export Your Domain
Export Your Domain
To export your domain, we will create a backup of both the files in your domain and the databases that your domain draws from. First, click on the ‘Manage Your Account’ menu at the top of your screen and select ‘Migration Information.
- To get started you’ll need to login to your control panel (http://buffscreate.net/dashboard) using your Identikey username and password.
- Once you’re logged in, you’ll see the cPanel interface. Now click on the Manage Your Account menu at the top of your screen and select Migration Information.
- To create a backup of your files and databases, simply click the button labeled Add Backup. The system will take a moment to create a backup. When it is complete, you will see the new backup appear below the button. You can click on this backup to download the file.
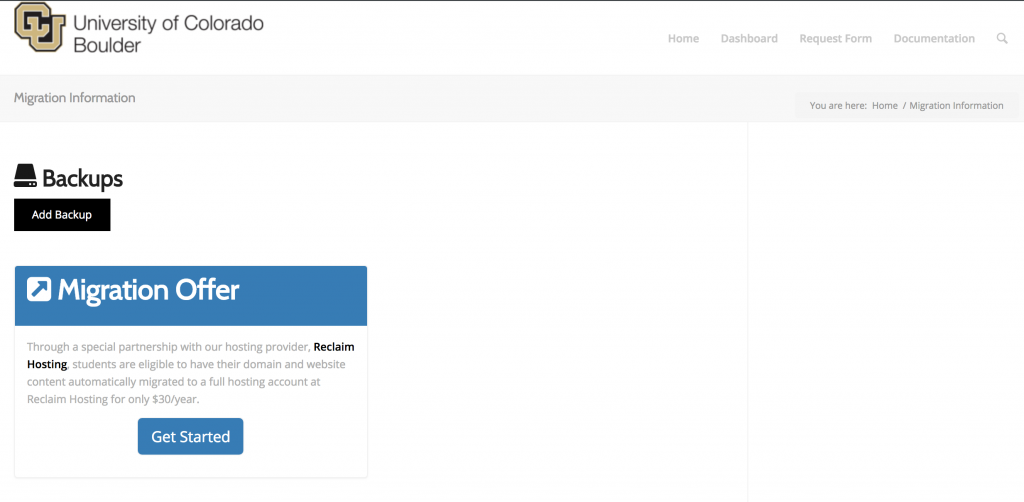
If you have a Top-Level domain (i.e. yourdomain.com), send a request to the Domain of One’s Own support team at your school asking them to unlock your domain, turn privacy protect off, and send you the transfer EPP code. These three items are required in order to initiate a successful domain transfer.
Next, follow the instructions provided by your new hosting platform on transferring domains/migrating websites. You can find instructions for common hosting platforms below:
GoDaddy Transfers
Wix Transfers
WordPress Domain Mapping
Squarespace Domain Transfer