BuffsCreate Template Tutorial
/in Wordpress, Getting Started /by Alexis Jade HarrisBuffsCreate Templates Tutorial
In this tutorial, we will walk you through the optional templates we have made available to you as options to kickstart your site. These options include the Digital Calling Card, TruWriter, and TruCollector, as well as a make your own option for teachers and faculty!
Templates Tutorial
For a transcript of this video, visit this link.
Resources Mentioned in this Video:
- Subdomain Help (We recommend creating your blog on a subdomain. To learn about what a subdomain is and how to create one, we have created this tutorial video)
- Learn more about the Digital Calling Card Template
- Go to our Digital Calling Card Instructions
- Learn more about the TruCollector Template
- Learn more about the TruWriter Template
BuffsCreate Blog Tutorial
/in Wordpress, Getting Started /by Alexis Jade HarrisBuffsCreate Blog Tutorial
In this tutorial, we will walk you through the steps to create a blog using WordPress in BuffsCreate.
Step 0: Creating a Subdomain
We recommend creating your blog on a subdomain. To learn about what a subdomain is and how to create one, we have created this tutorial video.
For a transcript of this video, visit this link
If you would like to learn more, or see step-by-step instructions with pictures, please visit this link.
Step 1: Installing WordPress on your BuffsCreate site
In this first installment of the BuffsCreate Blog Tutorial series, we show you how to install WordPress onto your newly created subdomain and walk through all of the setup settings you can fill out for the best blog/website experience!
For a transcript of this video, visit this link.
Step 2: Choosing an Initial Theme for Your WordPress Site
In this second installment of the BuffsCreate Blog Tutorial series, we show you how to choose a theme for your WordPress blog to change the appearance of your website to exactly what you’re envisioning!
For a transcript of this video, visit this link.
Step 3: Using a WordPress Starter Site (optional)
In this third installment of the BuffsCreate Blog Tutorial series, we show you how to use a theme with a starter site (in this case, the WordPress theme “Neve”) to give you an extra boost when starting a website from scratch. Starter sites offer a way for you to upload pre-written content and design to your website to edit instead of having to create everything from scratch. This is an optional step, but is recommended for beginners as it makes the process of starting a website easier.
For a transcript of this video, visit this link.
Step 4: Making Your Own Content with Posts vs. Pages
In this fourth installment of the BuffsCreate Blog Tutorial series, we show you how to add your own content onto your WordPress blog and explain the difference between WordPress posts and pages.
For a transcript of this video, visit this link.
Setting Up Subdomains
/in Domain Management, Understanding cPanel, Getting Started /by adminSetting Up Subdomains
For a transcript of this video, visit this link
A subdomain is one way of organizing and separating content on your site. To create a subdomain, use the following steps:
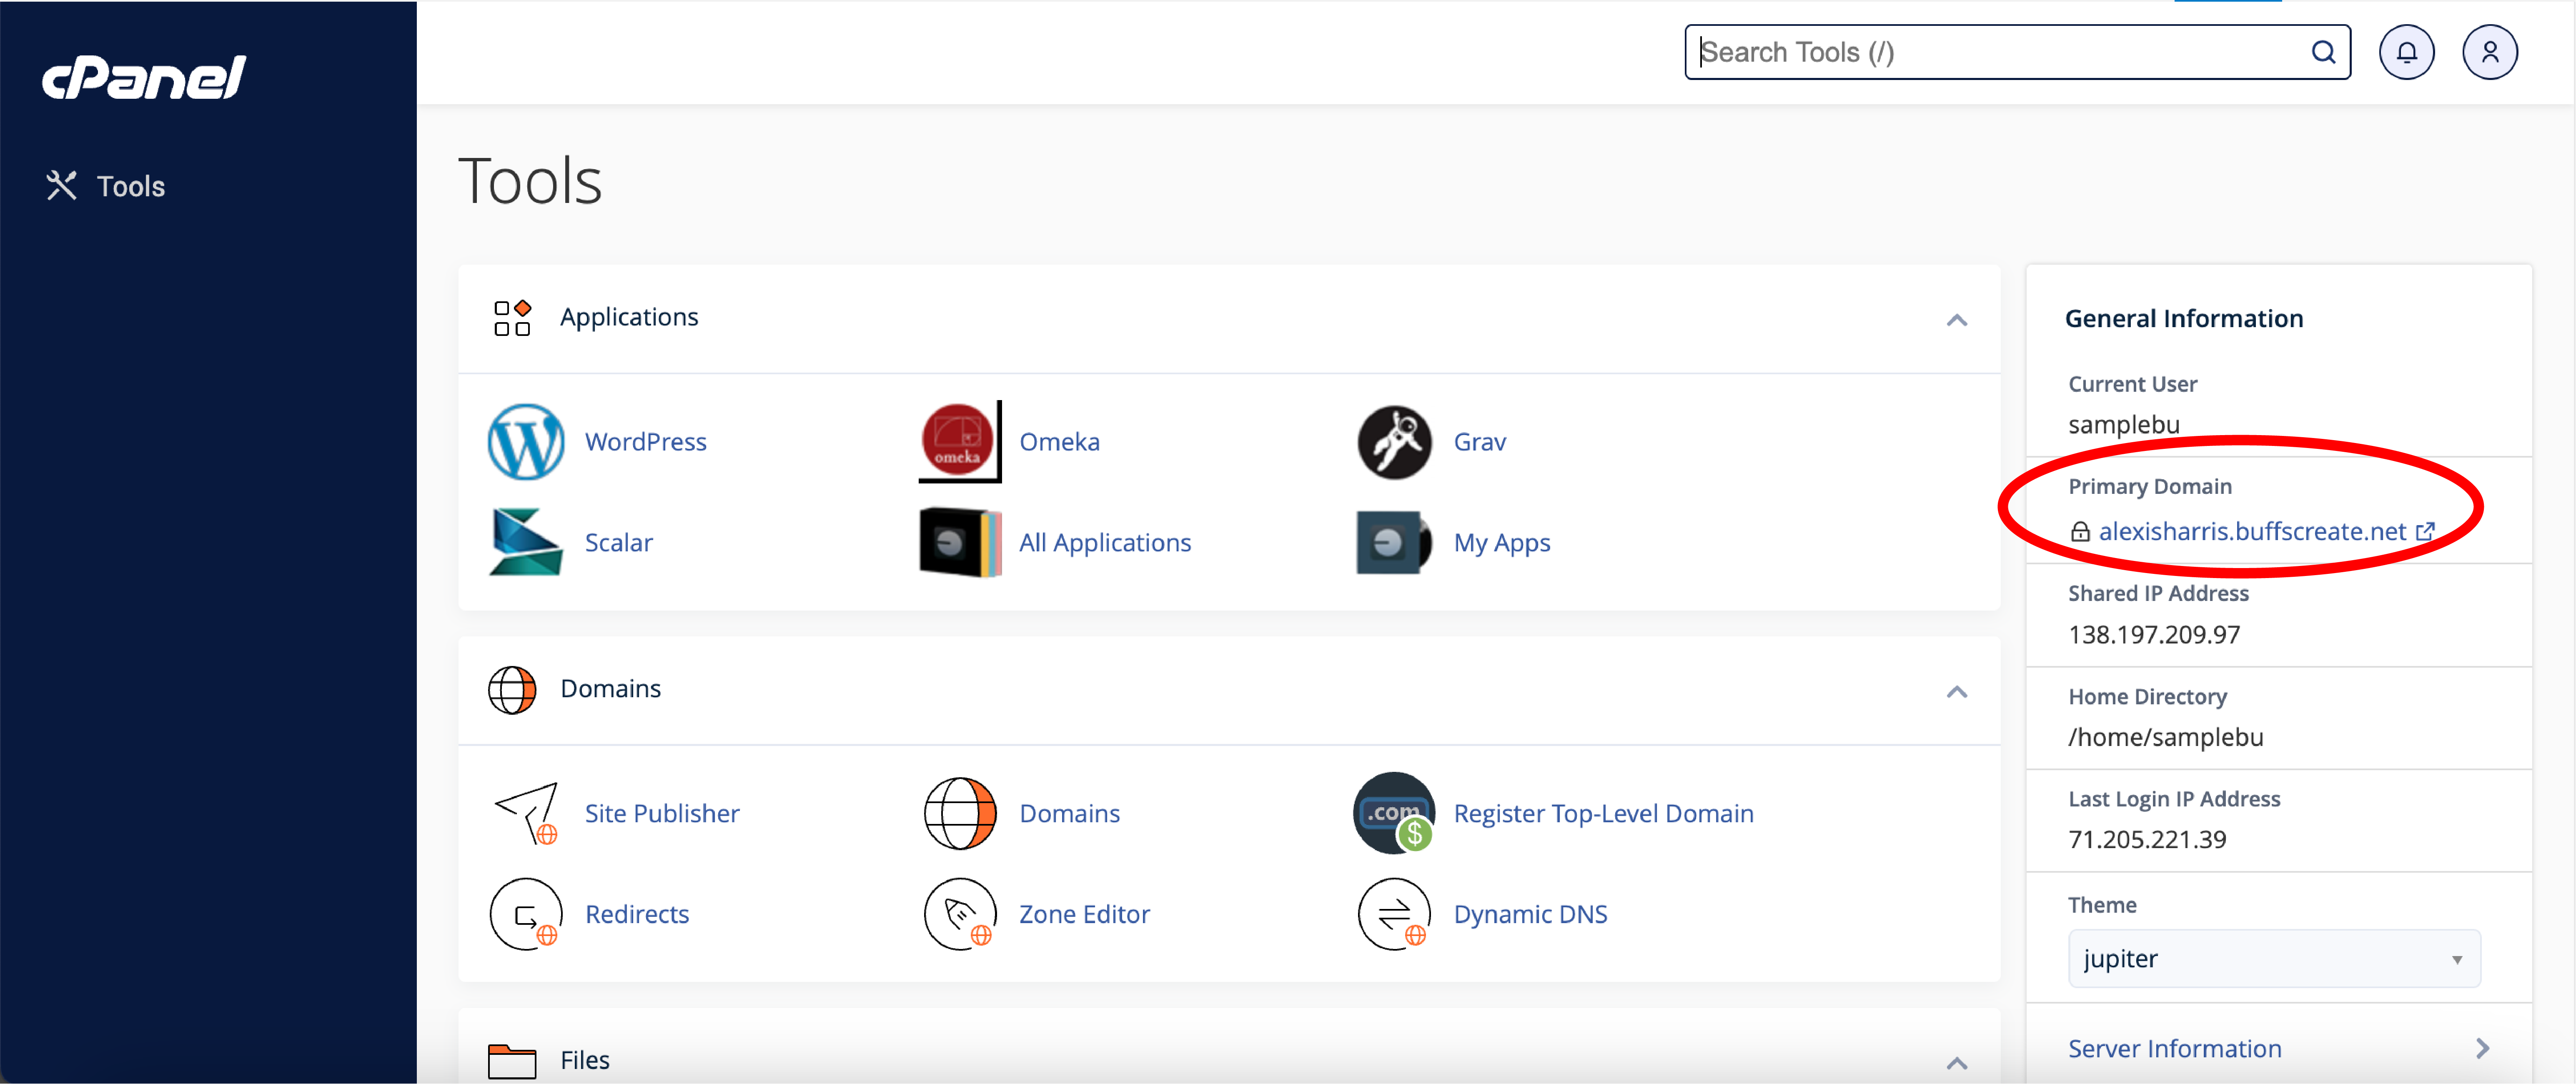
- Log into buffscreate.net with your Identikey username and password to access your cPanel.
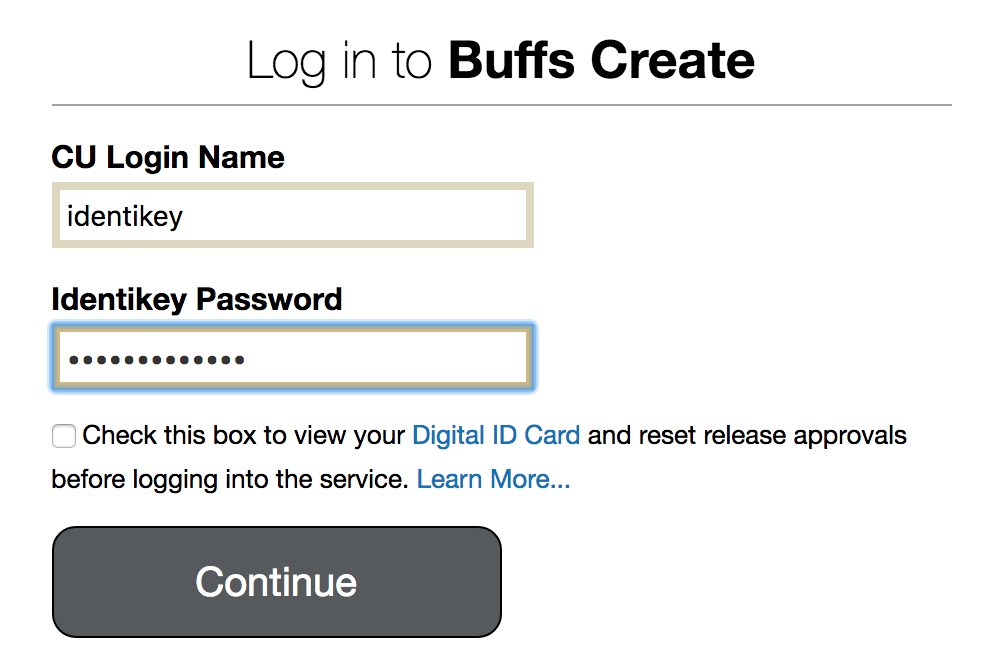
- Once logged in, you’ll be at the homepage of your cPanel. The easiest way to navigate your cPanel is using the search feature in the top right panel. Click the Search box and type “Domains” (without the quotes). When you press enter, you will automatically be taken to the Domains page. Or, you can scroll down and click the Domains icon under the Domains section of cPanel.
- Once on the domain page, navigate to the “Create a new domain” blue button on the right-hand side.
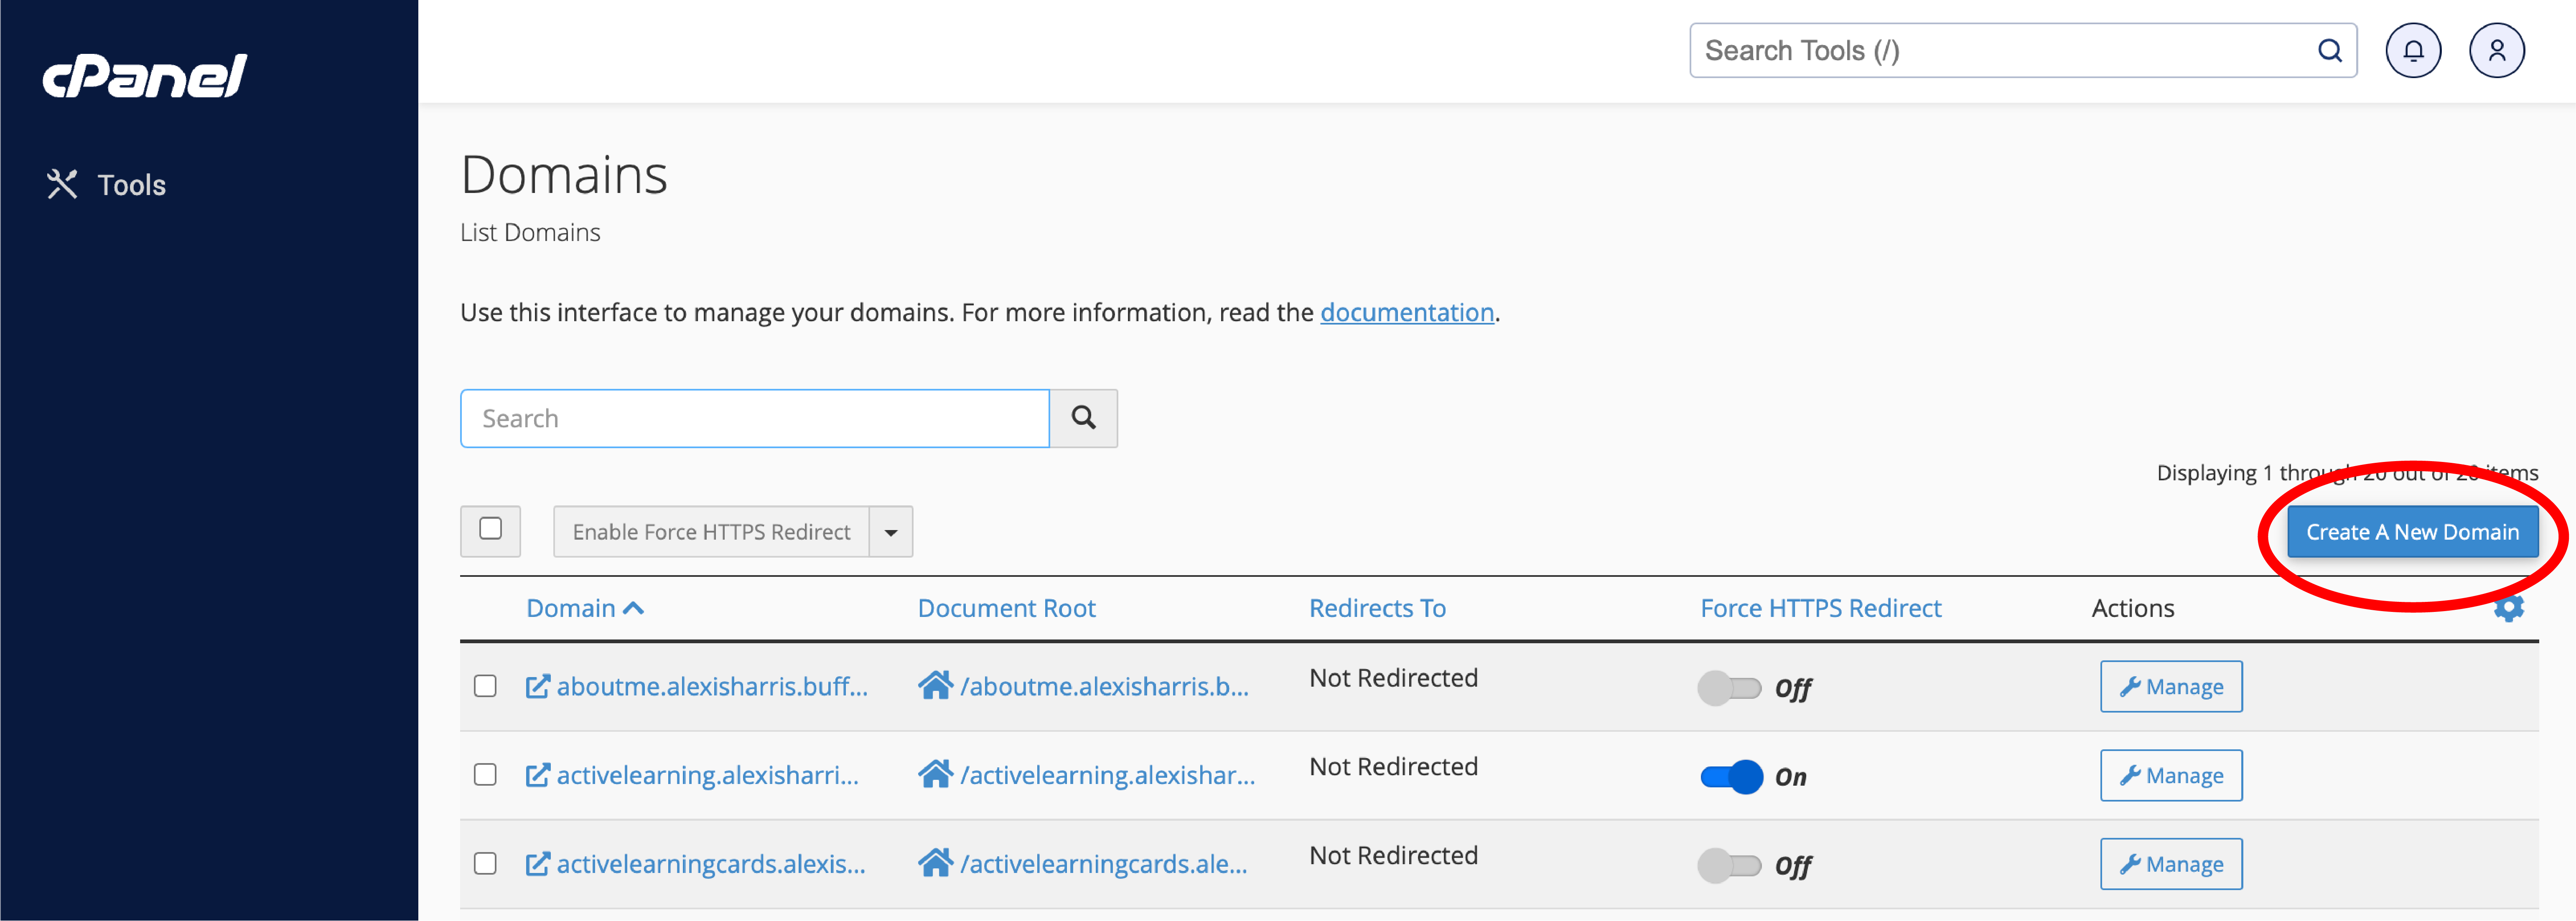
- Choose a name for your subdomain and type it into the Domain box. Just like top-level domains, subdomains can only contain numbers, letters, and hyphens, and the best subdomains are simple, short, and descriptive. Remember that the format for a subdomain is yourwords.yourrootdomain.buffscreate.net. For example: wiki.alexisharris.buffscreate.net. If this is not typed in this format, your subdomain will not work.

- Once you’ve typed in a name, cPanel will automatically populate the Document Root field for you. This will create a folder to contain your subdomain’s files. You’ll usually want this folder to match the name of your subdomain, so it’s easy to identify where different files live in your account. You might want to change the document root if you already have a folder in your account that has the same name as the subdomain you are trying to create, although this should be rare. Once you’re done, click Submit.

- Once you’re done, click Create. If everything went well, you should see a message that your subdomain was created successfully.
Your subdomain will now be available as an option for automatic installation of various software (WordPress, MediaWiki, etc). If you prefer to install web applications manually, you can do so in the document root (folder) you created in step 5. To learn more about installing an application on BuffsCreate via Installatron, visit our tutorial located here.
Applications Available in Installatron
/in Getting Started, Understanding cPanel /by adminApplications Available in Installatron
Installatron, the script installer that is part of the BuffsCreate cPanel, allows you to easily install Web applications to your Web space. Login to your Dashboard, and under Applications > All Applications, you will see all the available applications.
Installing Apps with Installatron
/in Understanding cPanel, Getting Started /by adminInstalling Apps with Installatron
- Installatron is a script installer that allows you to quickly and easily install Web applications to on the Web space. By default, when you use Installatron, the application you add will be automatically upgraded whenever a new version is available (and a backup will be kept, just in case).
Installing Applications Using Installatron
- To get started you’ll need to login to your control panel by going to http://buffscreate.net/dashboard/.
- Here you’ll log in with your Identikey username and password.

- Once logged in you’ll be on the homepage of your control panel (cPanel). You will need to scroll down until you see a section of your cPanel labeled Web Applications. Within this section, you will see a link to the Installatron which you should click. Or, you can type “installatron” (without quotes) into the search bar. When you press enter you will automatically be redirected to the Installatron page.

- A listing of all of the applications you can install by default in Installatron will appear. Navigate to the one you want to install, and click the icon.
- After clicking the icon, a page will appear with information about the application, links to resources, and a link to install it.
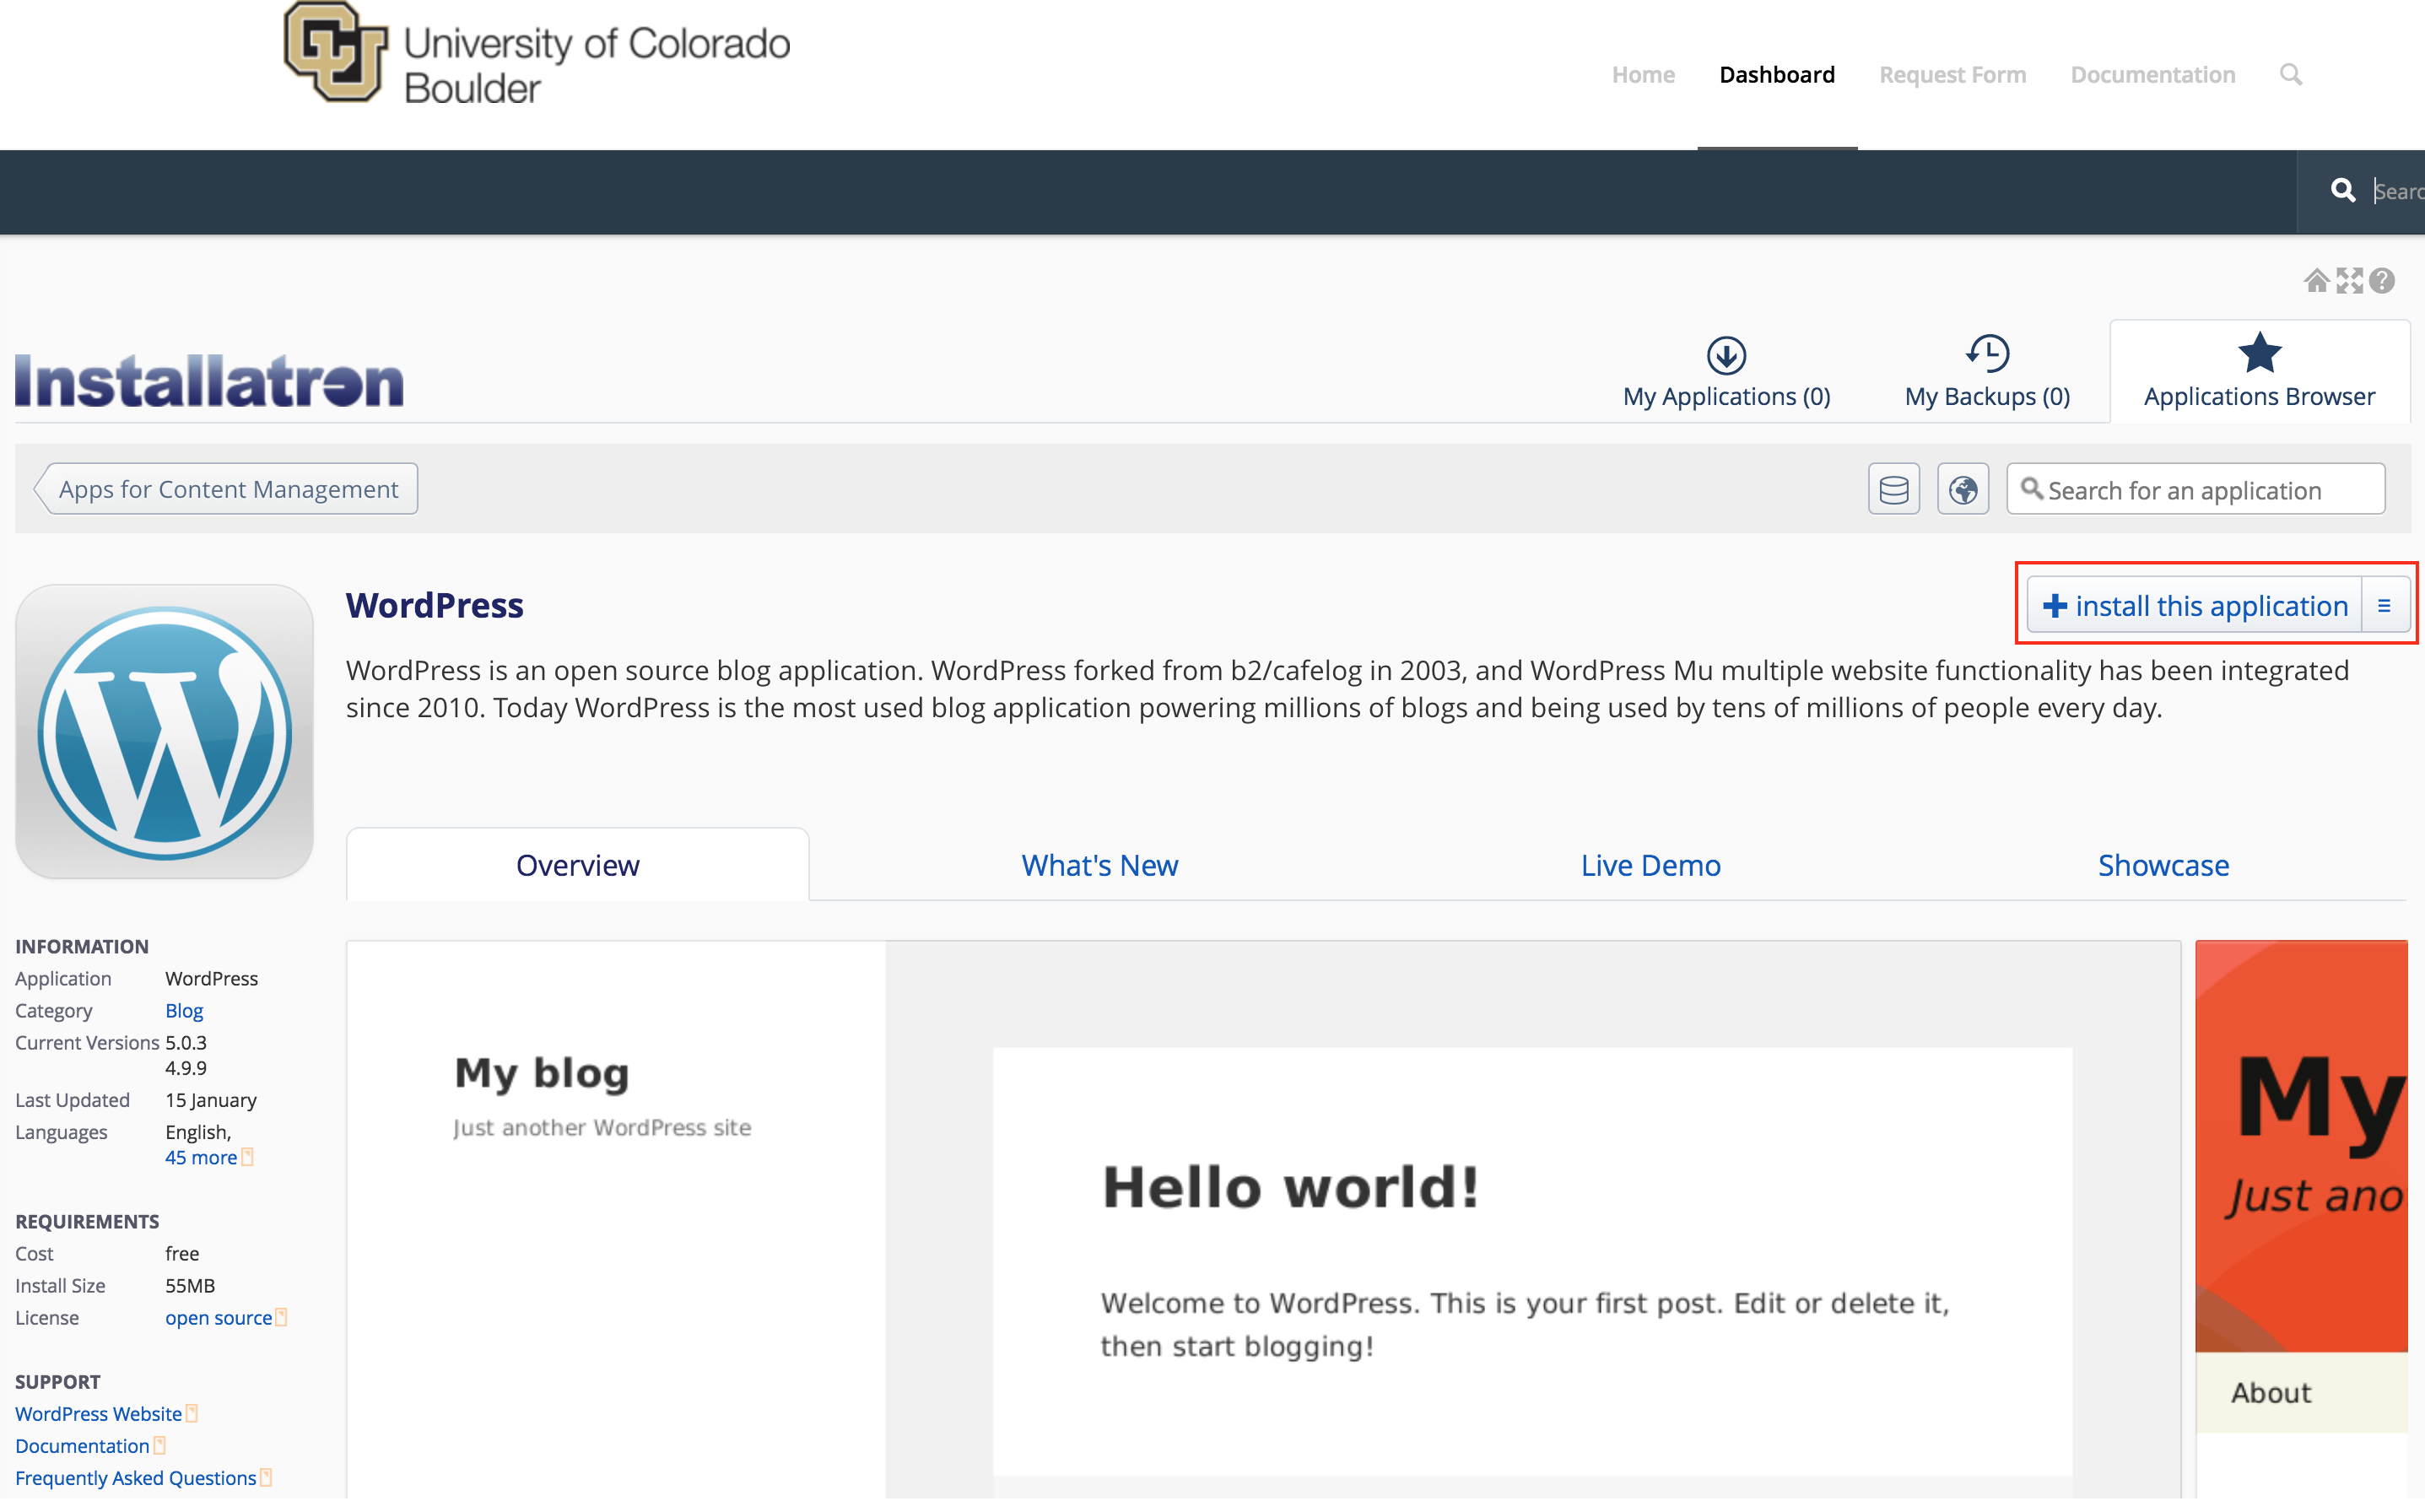
- Click Install this application when you are ready.
- A page will appear with a number of settings you can choose/change. The image below shows these settings; here is a rundown of them:
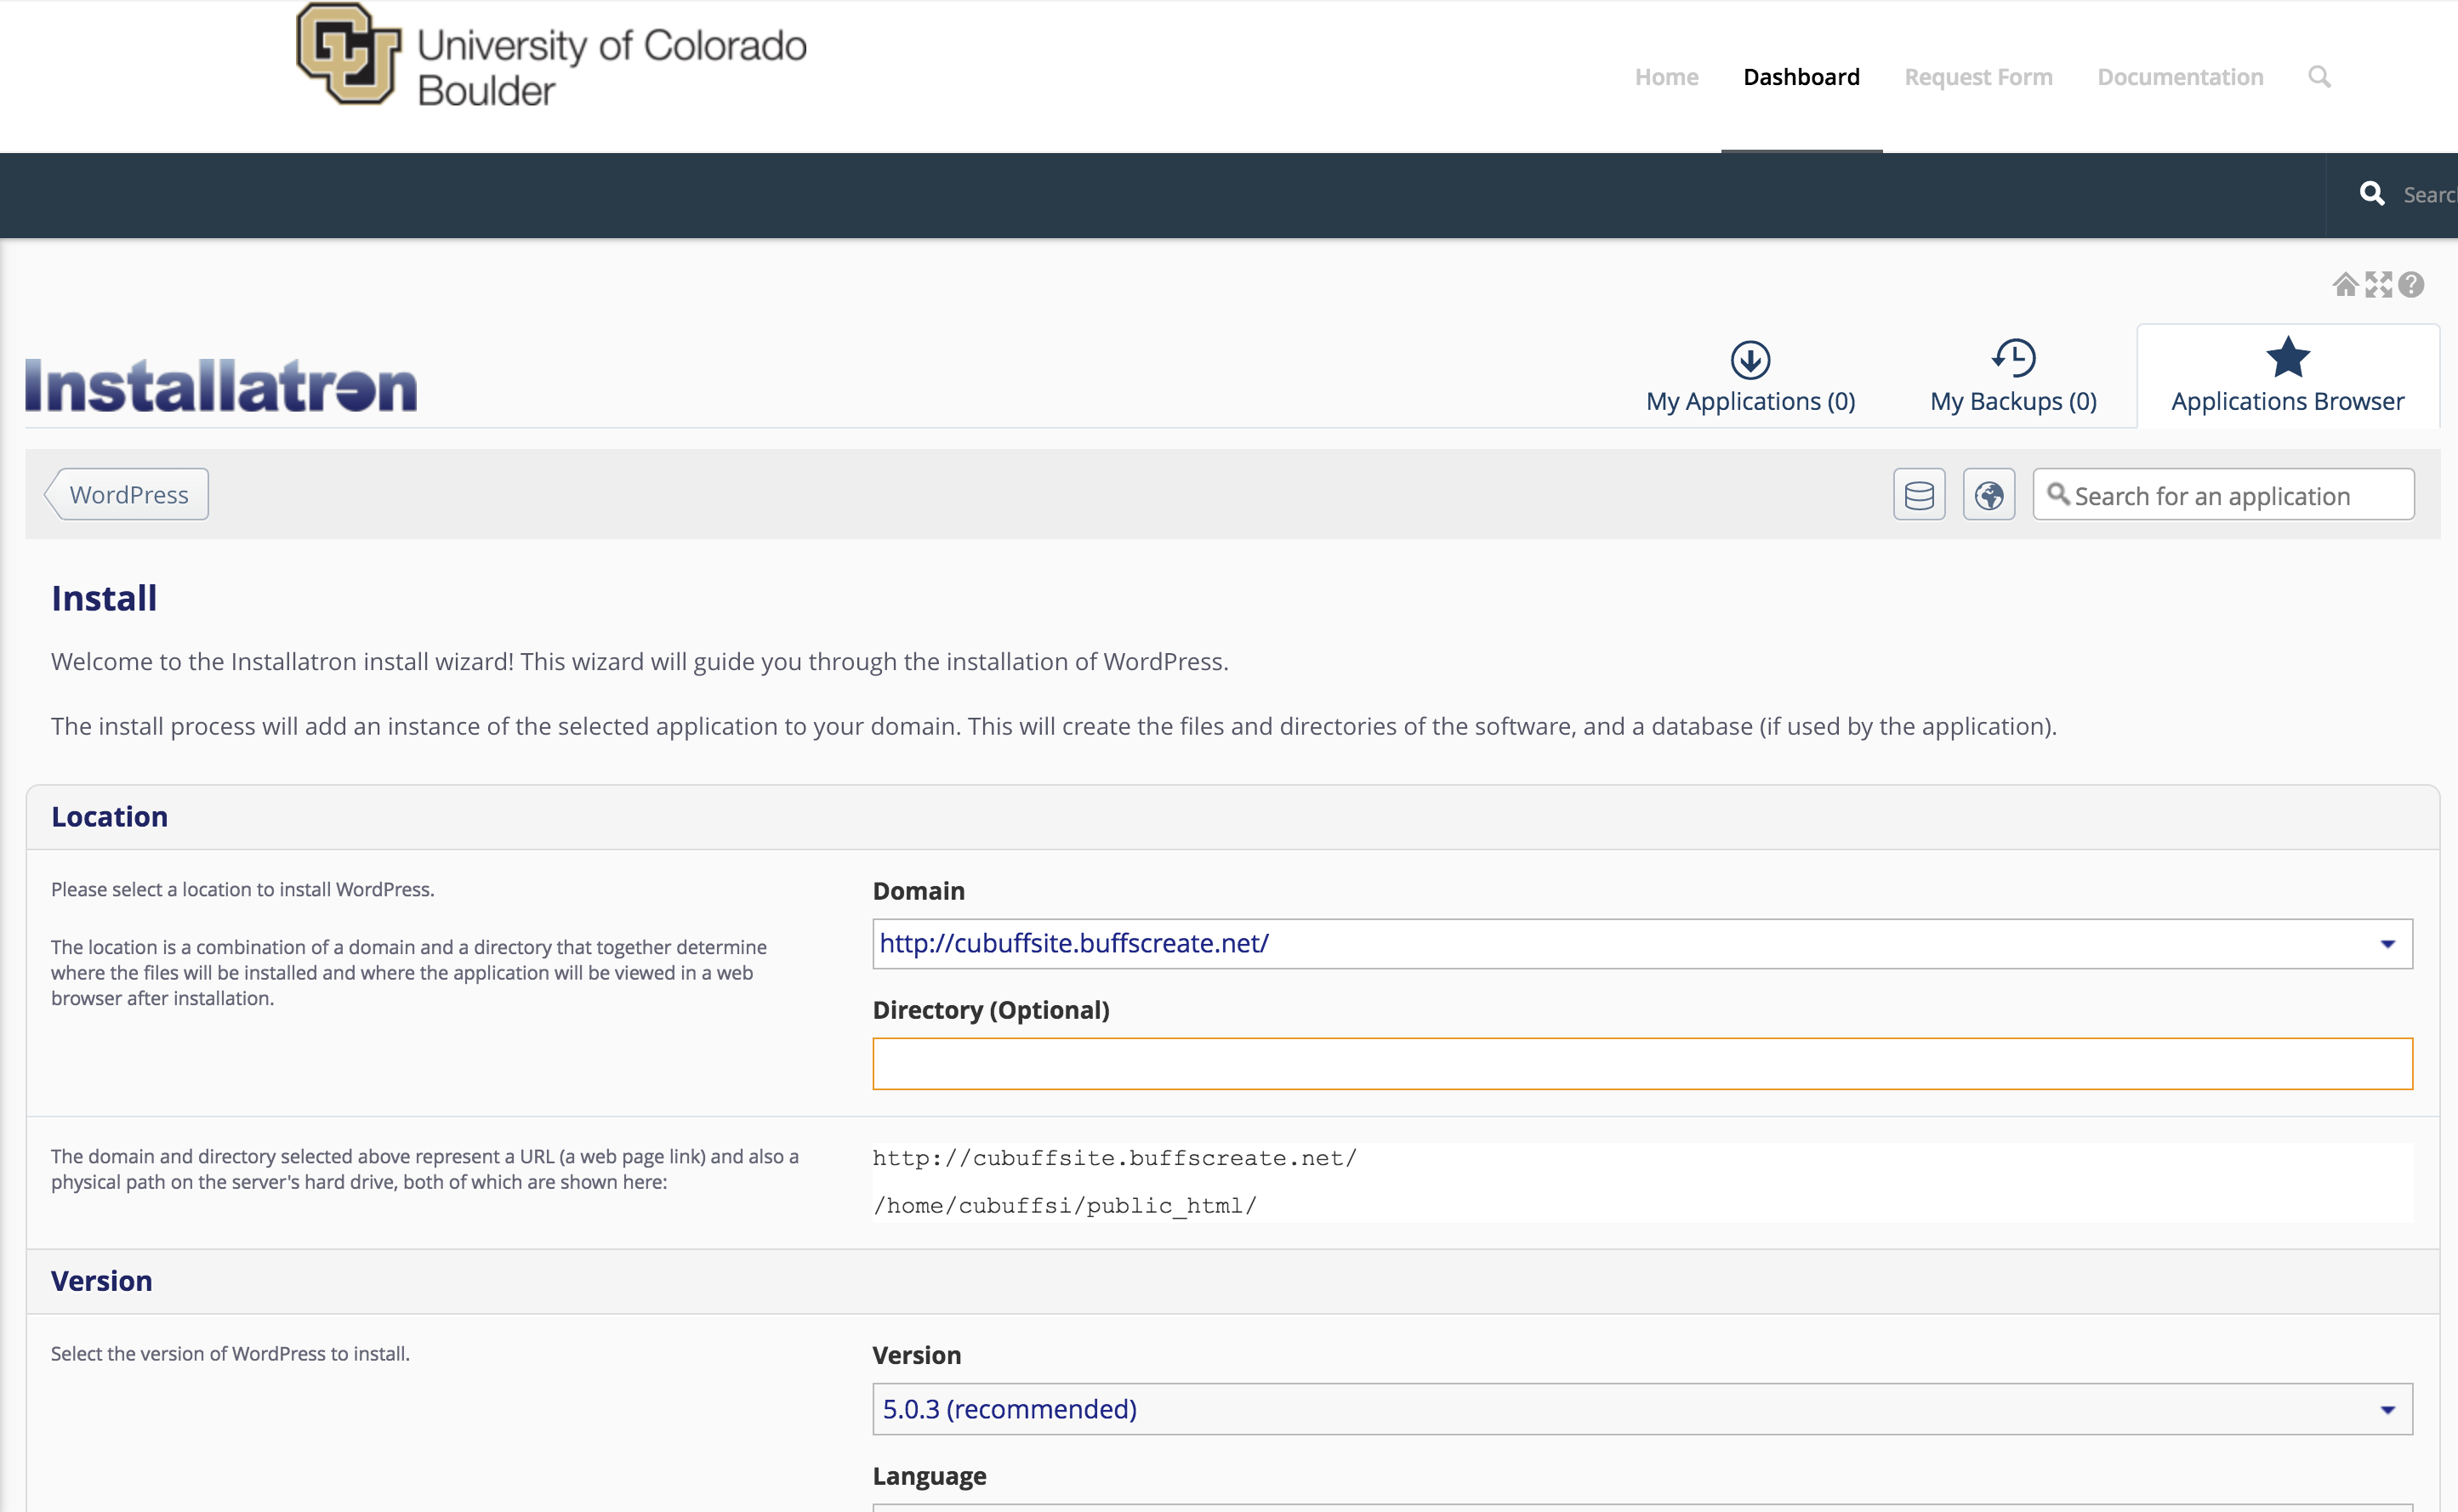
- Location: You’ll need to choose where to install your new application. You can install it at the root of your domain or in a subdomain (which you need to set up first). In addition, you can place your application in a folder (in either your root domain or a subdomain)
- Version Information: You can choose a version of the application. Generally, we recommend choosing the default version. It is likely to be the most recent, stable release.
- Updates & Database Management: By default, the system is set up to automatically upgrade (and create backups upon upgrading) all applications. In addition, by default, the database will be set up for you automatically. We recommend NOT changing these options.
- Username/Password: An username/password will be automatically generated for you. You can choose to change this if you like.
- Click Install: After installation, you’ll be taken back to the main Installatron page, with details about the application you just installed. At any time you can come back here to review the application details, back it up manually, or uninstall it.
To get to your new site, you can click the “website” link. What’s more, with certain applications you can use this space to log in to the admin area.
In addition, you’ll have received an email with your username/password and a link to your new site.
Understanding cPanel
/in Understanding cPanel, Getting Started /by adminUnderstanding cPanel
The cPanel, or control panel, is your landing page for BuffsCreate that lets you easily access and manage the files and applications of your account. Once logging into your account, you can see your active domains and personal account information at a glance.
Applications
BuffsCreate has four featured applications listed, but there are many, many more that can be utilized. Just click on All Applications in order to see what possibilities lie in wait for your domain! For more information about web applications, click here.

Domains
The Domains section of cPanel allows you to manage your addon domains, subdomains, aliases, and redirected domains. Additionally, you can use the Zone Editor to map different parts of your domain to other hosting environments.

- Addon Domains act as second website with its own unique content. Please note, you are required to register the new domain name before you can host it. Reclaim Hosting, our hosting provider, offers a service for this, although there are other domain registration companies if you’d prefer to look elsewhere.
- Subdomains act as a second website with its own unique content without having to register a new domain name. In general, you use your existing domain name and change the www to another relevant term. For example, student.buffscreate.net is a subdomain of buffscreate.net.
- Redirects map old domains to your existing domain.
- Aliases allow you to create additional domain names to be mapped to the current domain.
- Zone Editor handles DNS (Domain Name System)and allows you to see what’s happening behind the scenes when someone visits your website. For more information, see the “What is DNS?” section of this documentation.
Files
Within files, you are able to manage and organize all the files on your domain. To truly see the capabilities of these tools – just click and explore!

- File Manager allows you to manage all files connected to your account, including renaming, uploading, and deleting them. You can also get to your file manager using the Quick Links section at the top left of your cPanel.
- Images lets your manage images that have been previously saved to your account.
- Directory Privacy allows you to set a password to protect certain directories of your account.
- Disk Usage helps you monitor your account’s available space.
- File Transfer Protocol (FTP) is a fast and convenient way to transfer large files online. More information can be found in the “Setting up FTP” section of this documentation.
- R1Soft Restore Backups is the recommended backup option of the three backup icons displayed. You can read more about it under the “Automated Offsite Backups” section of Reclaim’s blog post “Backups Done Right”.
Databases
The Databases section allows you to create MySQL and PostgreSQL databases and users, and to modify and access to them. SQL stands for Structured Query Language. SQL is an international standard in querying and retrieving information from databases. PostgreSQL is an object-relational database management system.

- phpMyAdmin: manages a single database as well as a whole MySQL server.
- MySQL Database & MySQL Database Wizard: allows you to store and manage large amounts of information over the web; these are essential to running web-based applications, for example: bulletin boards, content management systems, and online shopping carts. The Wizard guides you through the setup of a MySQL database and user privileges.
- Remote MySQL: You can use this to add a specific domain name so visitors can connect to your MySQL databases.
Metrics
cPanel offers a number of different monitoring and statistic tools to help you administer your hosting account. Some of the more important and useful functions are explained in more depth below.

- Visitors: Use this to see your 1,000 most recent visitors for each of your domains.
- Errors: This displays the last 300 errors on your site; helpful if looking for missing files or broken links.
- Bandwidth: Bandwidth represents the amount of information that your server transfers and receives. Use this function to view the bandwidth usage for your site; see total usage, or by month. Includes web and mail usage.
- Raw Access: This is another stats function that allows you to see who has visited your website without graphics. A downloadable zip file of your site’s activity is availble.
- Awstats: Allows you to see your website visitors with visual aides.
- CPU and Concurrent Connection Usage: Lets you visualize the CPU and RAM usage of your site.
Security
cPanel has an entire security section devoted to protecting different parts of customer web sites from the unauthorized access of their viewers. The cPanel Security section includes SSH Access, IP Blocker, SSL/TLS, Hotlink Protection, Leech Protection and ModSecurity.

- SSH Access: Allows secure file transfers and remote logins online. Watch a video on how to manage SSH Keys on Reclaim Hosting.
- IP Blocker: This function allows you to block a range of IP addresses to prevent them from accessing your website. This is done by simply searching a qualified domain name.
- SSL/TLS: The SSL/TLS Manager will allow you to generate SSL certificates, certificate signing requests, and private keys. These are all parts of using SSL to secure your website. Information is sent encrypted instead of in plain text.
- Hotlink Protection: Prevents other websites from directly linking to files on your website.
- Leech Protection: Prevents your users from giving out or publicly posting their passwords to a restricted area of your site
- ModSecurity: Protects your website from various attacks using a web application firewall, provides additional tools to monitor your Apache web server.
- SSL/TLS Status: Allows you to view, upgrade, or renew your Secure Sockets Layer (SSL) certificates.
Software
The Software section of cPanel is located towards the bottom of your cPanel dashboard. The functions that get used most often in this category are Optimize Website and the Installatron Applications Installer.

- Optimize Website: This function allows you to optimize the performance of your website by tweaking the way Apache handles requests
- Installatron Applications Installer: Another route to the “View More” in Web Applications, which lists all available features that can be installed on your domain.
Advanced
The Advanced Section is located at near the very end of your cPanel dashboard. We recommend using this area only if you are familiar and comfortable with utilizing these features.

- Track DNS: this allows you to find out information about any domain; trace the route from the server to your computer, for example. This can be helpful to make sure your DNS is set up properly.
- Indexes: This manager customizes the way a directory can be seen (or not seen) online.
- Error Pages: In two simple steps, you can select the domain you wish to work with, and then create/edit error pages for that site that viewers will see.
- Virus Scanner: is essentially what it sounds like; start a new virus scan in Mail, Entire Home Directory, Public Web Space or Public FTP space.
Preferences
The Preferences area allows you to change your language, change the style of the interface, and your contact information. While we recommend that you leave your primary contact email as your school email address, you are more than welcome to add a second! Further, within Contact Information, you can update your notification preferences.

- Password & Security: allows you to change your cPanel password. (Needed for FTP connection, for example)
- Change Language: This tool allows you to change the language used in your cPanel Dashboard.
- Change Style: Use this tool to customize your cPanel interface; choose between Basic and Retrothemes.
- User Manager: Find how to use User Manager here
What Exactly is a Web Application?
/in Getting Started /by adminWhat Exactly is a Web Application?
In the most general terms, a Web application is a piece of software that runs on a Web server. A Web server is a just a specialized computer designed to host Web pages.
Most Web applications are comprised of two components: files and a database. When you install a Web application, you will need to make sure all of the files are copied over into the appropriate location AND that a database (and database user) has been set up to connect to those files. Often, you will have to do some configuration to make sure the application knows how to access the database.
The system we use for BuffsCreate uses a special script installer called Installatron (in cPanel) that allows you to automatically install dozens of open source applications. When you use Installatron, you don’t need to worry about moving files, creating databases, or doing the initial configuration. It’s all taken care of for you.
In order to run on the BuffsCreate server, Web applications must be able to run on a LAMP server, which is the particular kind of Web server that we use. Occasionally, a Web application may require additional components or modules that need to be installed on the server.
Registering a Domain
/in Getting Started /by adminRegistering a Domain
BuffsCreate currently utilizes both subdomains of buffscreate.net and top-level domains (a .com, .net, .org address) for the initial signup. You have the option to start with a free subdomain and then later decide you’d like to purchase a top-level domain after using the space. You can do this by registering a domain with a service provider (we make a recommendation below, but any domain provider should work) and adding it to your space as an Addon Domain.
To start you’ll need to get the domain registered. When choosing a domain we recommend keeping it all lower-case, avoiding hyphens, keeping it short, and of course it will need to be a unique address. Reclaim Hosting has made the process of registering a domain quite simple, and the domain will work with very few additional steps due to the integration they have with our hosting system. To register a domain, click here and type in the domain you’d like to purchase:

After ensuring the domain is available for purchase you’ll be prompted to select whether you’d like to protect the contact information associated with the domain. This option (referred to as ID Protect) used to cost an additional $7, but it is now free. We recommend checking this ID Protect box to protect your contact information.
You’ll also be prompted for nameservers for the domain. If registering the domain through Reclaim Hosting you can leave these with the default. If you decide to register the domain elsewhere, you’ll want to point the nameservers to ns1.reclaimhosting.com and ns2.reclaimhosting.com in order for the domain to work with our system.
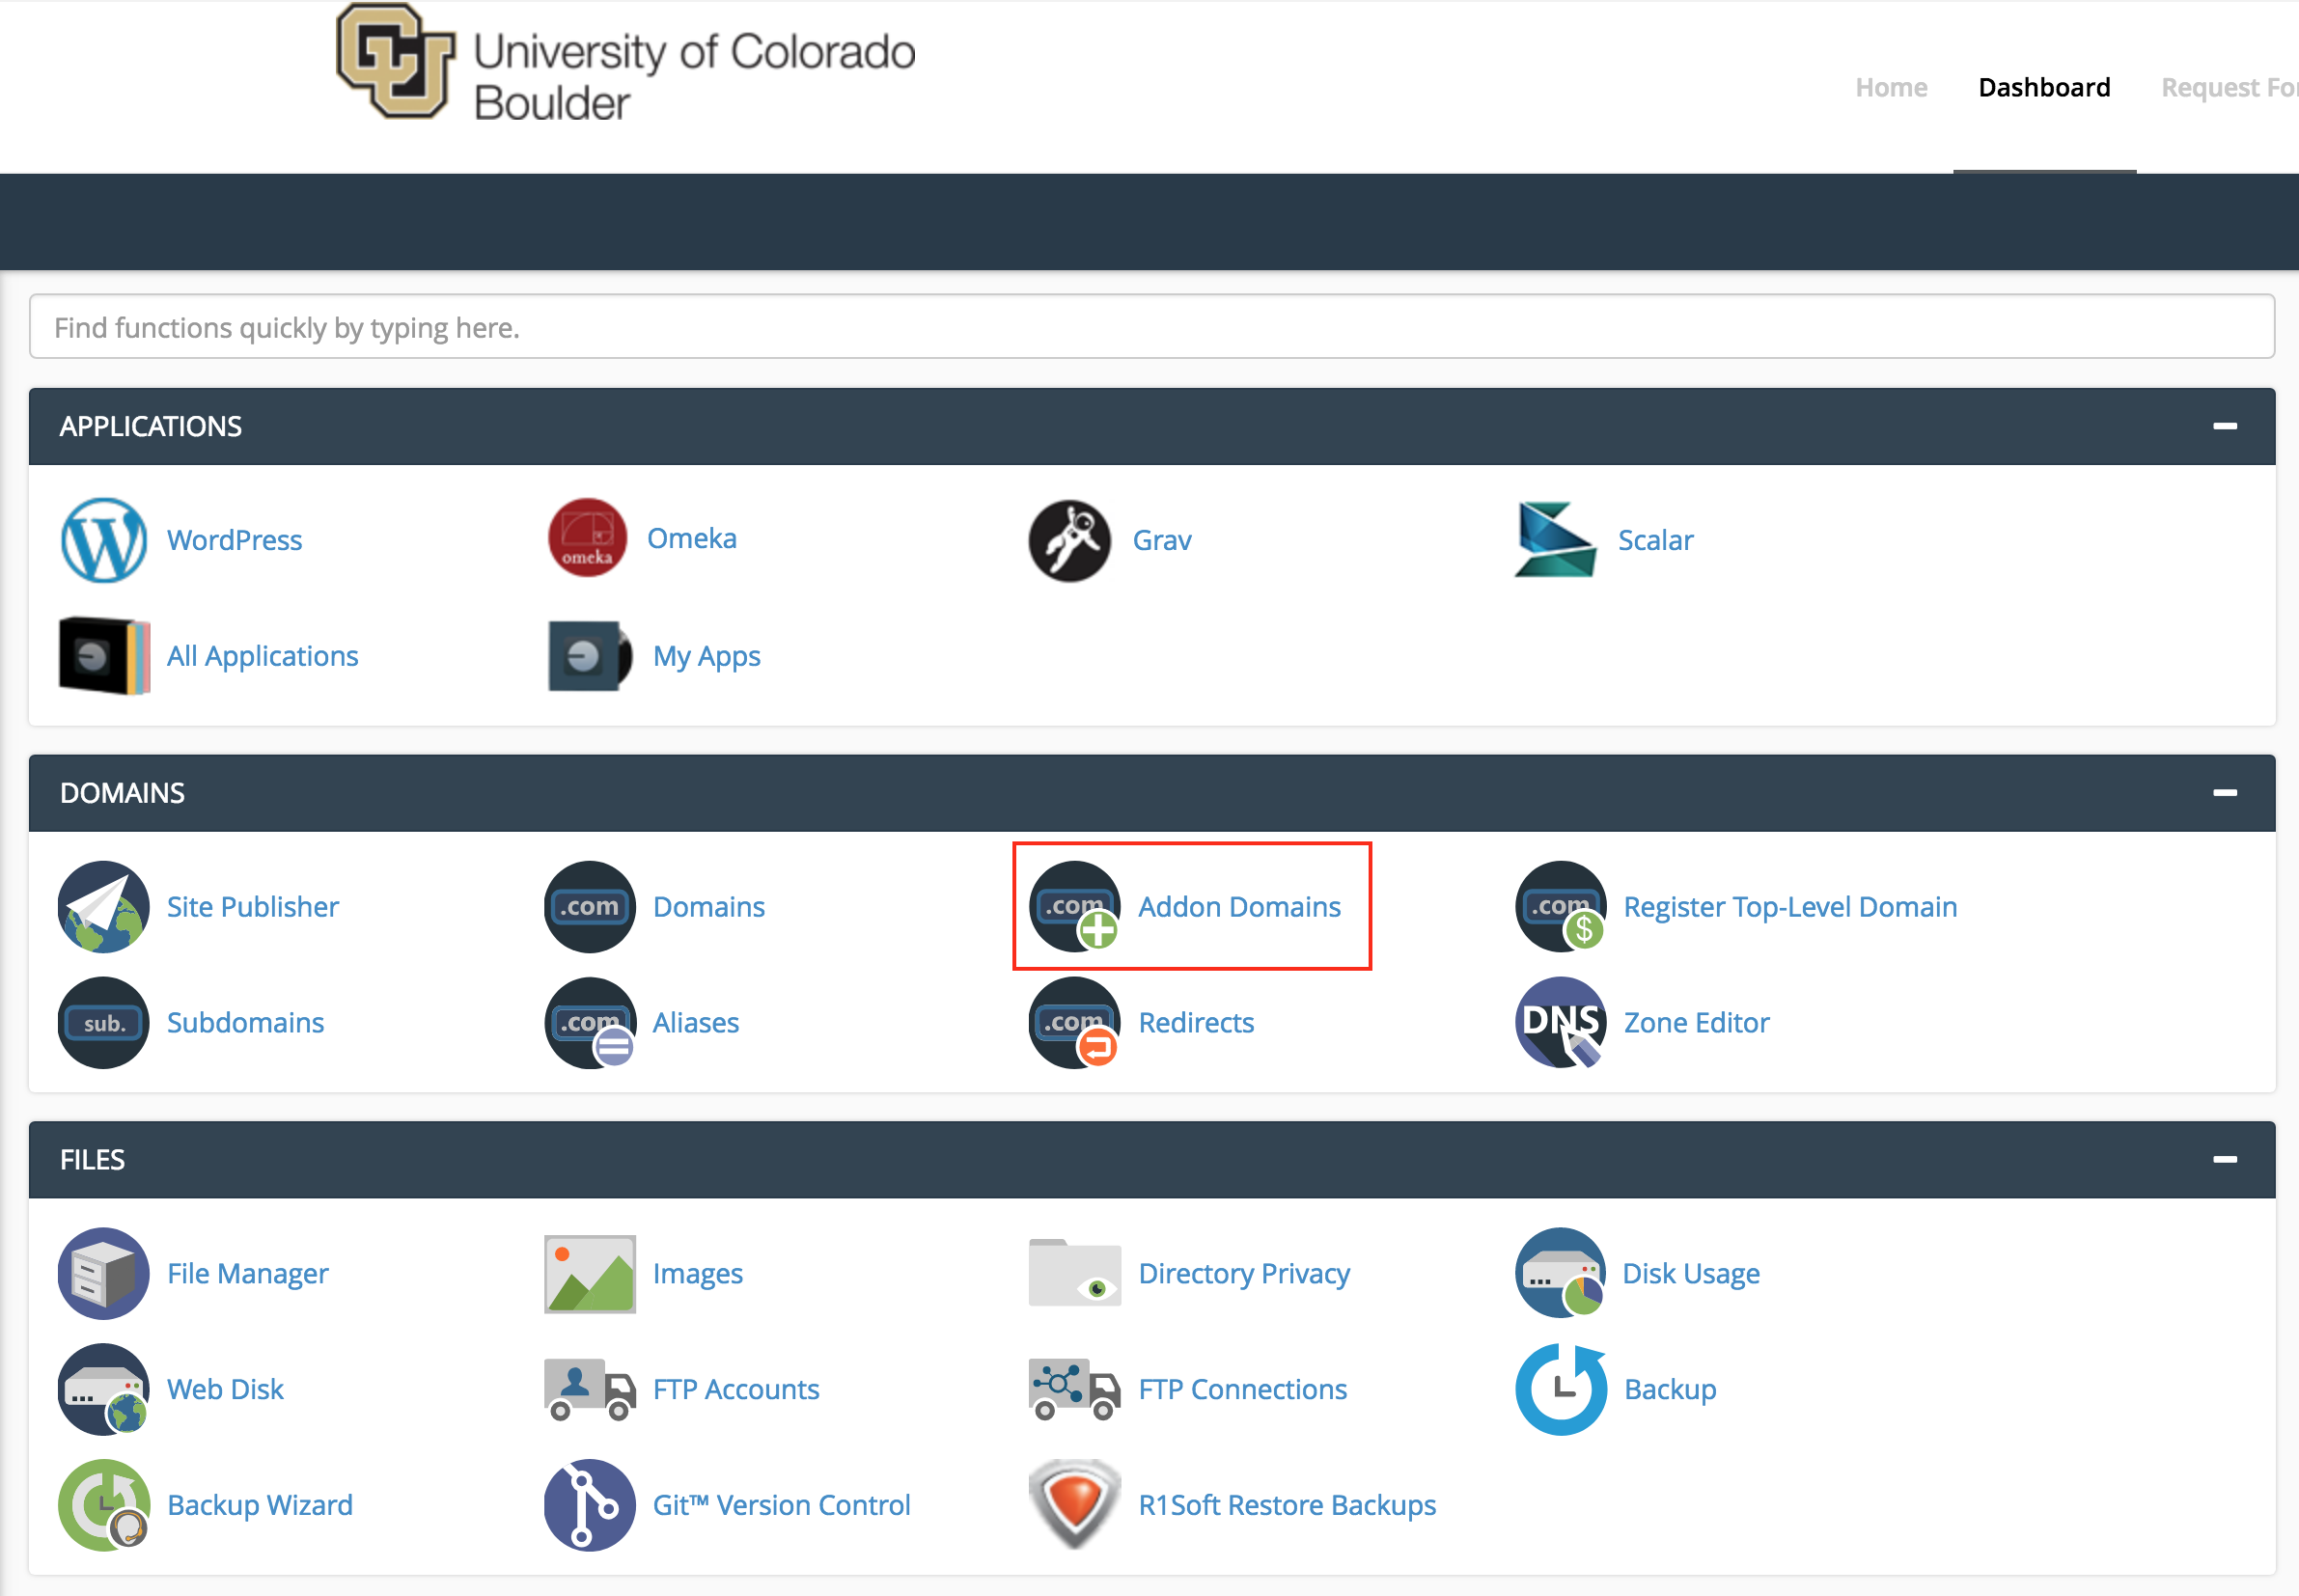
Once you’ve completed the checkout process with payment information the domain will be registered automatically. The last step is to add it to your existing account here at BuffsCreate. To do that you’ll log into your account at http://buffscreate.net/dashboard. Navigate to your cPanel > Domains > Add-on Domains.
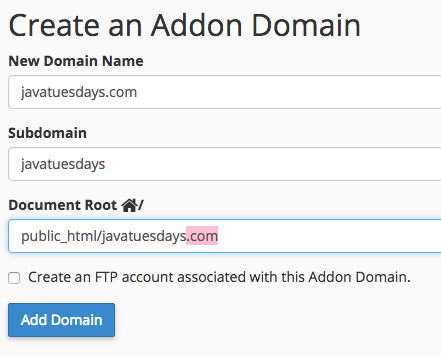
- On the following page, type your newly purchased domain in the new domain name field. (The subdomain and Document Root fields will populate automatically.)
- You can change the document root (the directory of your files) if you wish. Some like to remove the “.com” from the Document Root field for the convenience when using FTP.
- The option to create an additional FTP account is present but not necessary.
- Once the domain is entered click Add Domain to add the domain to your hosting account.
At this point, the domain will now be hosted in your account and you can use it to install software, upload files, and any number of other actions available to you in cPanel.
Privacy
/in Getting Started /by adminPrivacy
What you add to your buffscreate.net webspace rests entirely with you. You can choose not to pick a domain that reveals your name. You can use a pseudonym on your actual site. However, when you sign up through the default process, your name does get published as part of the public record about your domain name. Anyone can find it by looking up details about the ownership of that domain name through a public “Whois” request.
This is NOT an issue if you’re already planning on using your name openly on your site (in your domain name or elsewhere). This option is aimed, specifically, at those who, for whatever reason, feel they want to take every precaution to hide their identity on their site.
What Can You Do With Your Account?
/in Getting Started /by adminWhat Can You Do With Your Account?
Your ability to do things on BuffsCreate is dictated to a large degree by the limits of your imagination. That said, there are some technical requirements and limitations that you should be aware of and might want to review.
To spark your imagination, here are some ideas that might help you get started:
Install a Web Application in Your Space
BuffsCreate makes it very simple to install certain Web applications in your Web space. Web applications are just special software that run on a web server. Usually, they allow you to build and manage a website. The kind of site you can build depends on the type of application you install. Here are some examples of applications that you can easily install within the buffscreate.net web hosting interface:

WordPress: WordPress is a simple-to-use blogging application. The tool also comes with a huge array of plugins & themes to allow you to create virtually any kind of website imaginable. We have guides on using WordPress here.

Omeka: Omeka is an open-source web application that can be used to create and display online digital collections and archives. We have information available to help you install and use Omeka here.

Scalar: Scalar is a content management system with the idea of creating non-linear books on the web. You can learn more about its functions and how to install it here.

Grav: Grav is an open source, flat-file CMS made for folks who are looking for something a little more experimental. Grav provides a straightforward framework for creating pages and inserting media. We have additional resources for Grav here.

Mediawiki: It is the open-source wiki software that runs the online encyclopedia, Wikipedia. This tool may be right for you if you’re interested in publishing documents and then collaborating with others on them. Find our guides on Mediawiki here.
These are just a few of the open-source applications that are available to you in your BuffsCreate web space. We encourage you to read more about what Web applications are and which ones are available to you through this project.
Organize Your Site with Subdomains and Folders
Through this project, you’ve received a domain name that you can actually subdivide and organize anyway you like. One easy way to organize your domain is to create subdomains, in which you can then install other applications. In addition, you can just set up subfolders for your site (which can also have their own applications installed in them). Here’s an example of how you might organize your site (using the subdomain vs. the subfolder approach)
| Subdomain Approach | Subfolder Approach | |
| yourdomain.com (“root”) | Install WordPress as your “main site” | yourdomain.com (“root”) |
| course1.yourdomain.com | Install a second WordPress instance for a course you’re taking | yourdomain.com/course1 |
| photos.yourdomain.com | Install ZenPhoto for a public photo gallery of your photos | yourdomain.com/photos |
| docs.yourdomain.com | Install MediaWiki for a club you belong to that wants to collaboratively edit its bylaws | yourdomain.com/docs |
| files.yourdomain.com | Install OwnCloud so you can access your files on your laptop and at work | yourdomain.com/files |
This is just an example of a way to organize your site and then use different sections to do different things. There is no one solution to this challenge, and what you do should be driven by what makes sense to you. To start, you may just want to install one thing at the “root” of your domain, and then let the rest evolve as you get to know more about what’s possible.
Map Your Domain (or a Subdomain)
If you already have a digital presence that you’d like to pull into your BuffsCreate space, domain mapping is an option you may wish to explore. This allows you to assign your domain (or a subdomain) to another service. Some services that work with domain mapping are:
When you map a domain, users who visit your URL will automatically see your space on one of these services. It’s a great way to incorporate your activity elsewhere into your domain, and it might be a good first step if you’ve already established a presence somewhere else and just want to point your new domain to that space.

