When You Leave

There are a few reasons that could lead you to consider exporting your website content from BuffsCreate. Perhaps you’re leaving the University, or maybe you’re just wanting to use your data on another hosting environment. Whatever the case, you have a couple options for how you want to handle this:

If you are leaving the college, you can migrate your webspace from BuffsCreate to our hosting provider, Reclaim Hosting, for a discounted price. Detailed instructions can be found here.

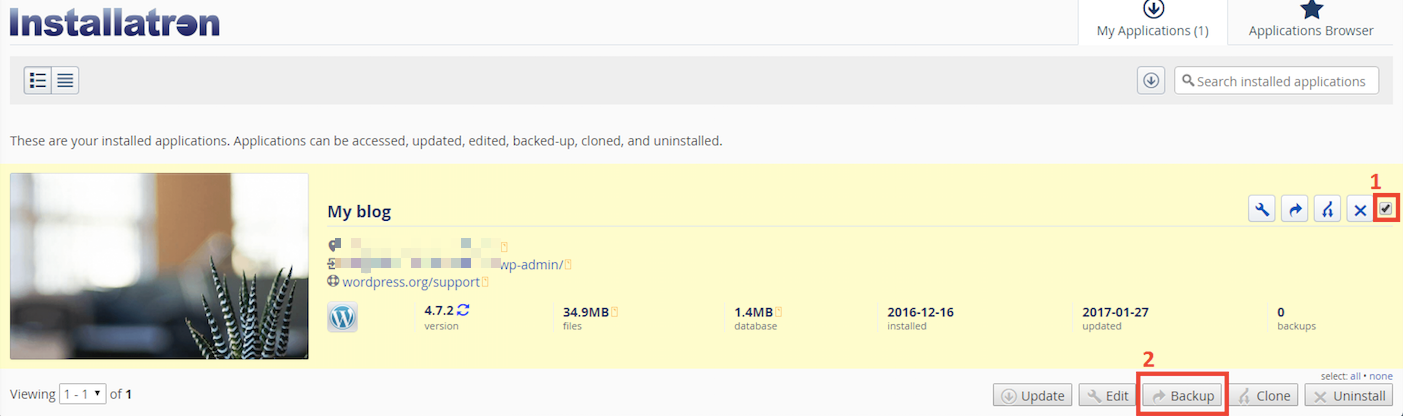
If you would like to move to a third party service, you’ll want to capture a backup of your site. From there you’ll be able to import this backup into a handful of other web hosting services. You can find instructions on taking a backup here.

Understanding cPanel

The cPanel, or control panel, is your landing page for BuffsCreate that lets you easily access and manage the files and applications of your account. Once logging into your account, you can see your active domains and personal account information at a glance.

Applications

BuffsCreate has four featured applications listed, but there are many, many more that can be utilized. Just click on All Applications in order to see what possibilities lie in wait for your domain! For more information about web applications, click here.

cPanel section for Application installations

Domains

The Domains section of cPanel allows you to manage your addon domains, subdomains, aliases, and redirected domains. Additionally, you can use the Zone Editor to map different parts of your domain to other hosting environments.

cPanel section for Domain management tools

    • Addon Domains act as second website with its own unique content. Please note, you are required to register the new domain name before you can host it. Reclaim Hosting, our hosting provider, offers a service for this, although there are other domain registration companies if you’d prefer to look elsewhere.
    • Subdomains act as a second website with its own unique content without having to register a new domain name. In general, you use your existing domain name and change the www to another relevant term. For example, student.buffscreate.net is a subdomain of buffscreate.net.
    • Redirects map old domains to your existing domain.
    • Aliases allow you to create additional domain names to be mapped to the current domain.
    • Zone Editor handles DNS (Domain Name System) and allows you to see what’s happening behind the scenes when someone visits your website. For more information, see the “What is DNS?” section of this documentation.

Files

Within files, you are able to manage and organize all the files on your domain. To truly see the capabilities of these tools – just click and explore!

cPanel section for File management tools

    • File Manager allows you to manage all files connected to your account, including renaming, uploading, and deleting them. You can also get to your file manager using the Quick Links section at the top left of your cPanel.
    • Images lets your manage images that have been previously saved to your account.
    • Directory Privacy allows you to set a password to protect certain directories of your account.
    • Disk Usage helps you monitor your account’s available space.
    • File Transfer Protocol (FTP) is a fast and convenient way to transfer large files online. More information can be found in the “Setting up FTP” section of this documentation.
    • R1Soft Restore Backups is the recommended backup option of the three backup icons displayed. You can read more about it under the “Automated Offsite Backups” section of Reclaim’s blog post “Backups Done Right”.

Databases

The Databases section allows you to create MySQL and PostgreSQL databases and users, and to modify and access to them. SQL stands for Structured Query Language. SQL is an international standard in querying and retrieving information from databases. PostgreSQL is an object-relational database management system.

cPanel section for Database management tools

    • phpMyAdmin: manages a single database as well as a whole MySQL server.
    • MySQL Database & MySQL Database Wizard: allows you to store and manage large amounts of information over the web; these are essential to running web-based applications, for example: bulletin boards, content management systems, and online shopping carts. The Wizard guides you through the setup of a MySQL database and user privileges.
    • Remote MySQL: You can use this to add a specific domain name so visitors can connect to your MySQL databases.

Metrics

cPanel offers a number of different monitoring and statistic tools to help you administer your hosting account. Some of the more important and useful functions are explained in more depth below.

cPanel section for Metric tools

    • Visitors: Use this to see your 1,000 most recent visitors for each of your domains.
    • Errors: This displays the last 300 errors on your site; helpful if looking for missing files or broken links.
    • Bandwidth: Bandwidth represents the amount of information that your server transfers and receives. Use this function to view the bandwidth usage for your site; see total usage, or by month. Includes web and mail usage.
    • Raw Access: This is another stats function that allows you to see who has visited your website without graphics. A downloadable zip file of your site’s activity is availble.
    • Awstats: Allows you to see your website visitors with visual aides.
    • CPU and Concurrent Connection Usage: Lets you visualize the CPU and RAM usage of your site.

Security

cPanel has an entire security section devoted to protecting different parts of customer web sites from the unauthorized access of their viewers. The cPanel Security section includes SSH Access, IP Blocker, SSL/TLS, Hotlink Protection, Leech Protection and ModSecurity.

cPanel section for Security tools

    • SSH Access: Allows secure file transfers and remote logins online. Watch a video on how to manage SSH Keys on Reclaim Hosting.
    • IP Blocker: This function allows you to block a range of IP addresses to prevent them from accessing your website. This is done by simply searching a qualified domain name.
    • SSL/TLS: The SSL/TLS Manager will allow you to generate SSL certificates, certificate signing requests, and private keys. These are all parts of using SSL to secure your website. Information is sent encrypted instead of in plain text.
    • Hotlink Protection: Prevents other websites from directly linking to files on your website.
    • Leech Protection: Prevents your users from giving out or publicly posting their passwords to a restricted area of your site
    • ModSecurity: Protects your website from various attacks using a web application firewall, provides additional tools to monitor your Apache web server.
    • SSL/TLS Status: Allows you to view, upgrade, or renew your Secure Sockets Layer (SSL) certificates.

Software

The Software section of cPanel is located towards the bottom of your cPanel dashboard. The functions that get used most often in this category are Optimize Website and the Installatron Applications InstallercPanel section for Software

    • Optimize Website: This function allows you to optimize the performance of your website by tweaking the way Apache handles requests
    • Installatron Applications Installer: Another route to the “View More” in Web Applications, which lists all available features that can be installed on your domain.

Advanced

The Advanced Section is located at near the very end of your cPanel dashboard. We recommend using this area only if you are familiar and comfortable with utilizing these features.

cPanel section for Advanced tools

    • Track DNS: this allows you to find out information about any domain; trace the route from the server to your computer, for example. This can be helpful to make sure your DNS is set up properly.
    • Indexes: This manager customizes the way a directory can be seen (or not seen) online.
    • Error Pages: In two simple steps, you can select the domain you wish to work with, and then create/edit error pages for that site that viewers will see.
    • Virus Scanner: is essentially what it sounds like; start a new virus scan in Mail, Entire Home Directory, Public Web Space or Public FTP space.

Preferences

The Preferences area allows you to change your language, change the style of the interface, and your contact information. While we recommend that you leave your primary contact email as your school email address, you are more than welcome to add a second! Further, within Contact Information, you can update your notification preferences.

cPanel section for Preferences

    • Password & Security: allows you to change your cPanel password. (Needed for FTP connection, for example)
    • Change Language: This tool allows you to change the language used in your cPanel Dashboard.
    • Change Style: Use this tool to customize your cPanel interface; choose between Basic and Retrothemes.
    • User Manager: Find how to use User Manager here

Managing Backups

Any application that you install in BuffsCreate using the cPanel/Installatron is set to automatically create a backup of the whole app every time the software updates. The backups expire after 14 days, but they can quickly eat up quota space in that time, especially since some apps (such as WordPress) update automatically. Follow the steps in each section below to take more control over the space that backups use in your account.

1. Turn off the automatic Installatron backup

  • Go to your cPanel
  • Go to Applications > WordPress > My Applications.
  • From there, select the wrench next to your site’s name.
  • Scroll down to Automatic Update Backup and set that to Do not create a backup

Application Backups screen with an arrow pointing to "Do not create a backup" under "Automatic Update Backup"

2. View restore points in R1Soft Backups App

The R1Soft Restore Backups app can be found in the “Files” section of your cPanel dashboard.

Files section of cPanel with R1Soft Restore Backups circled

This app should already be active so there are no additional steps you need to take to set it up. R1Soft automatically creates an off-site backup of your files and databases nightly. You can open the app from your cPanel to verify that there are restore points listed. More information about how this app works can be found in this documentation from our hosting provider, Reclaim Hosting, under the “Automated Offsite Backup” heading: https://reclaimhosting.com/backups-done-right/.

3. Create a manual Installatron backup before major changes

While R1Soft creates daily backups of all of your content, it’s best practice to have a backup of your application from right before you start tinkering, just in case anything goes wrong. That way you won’t lose any content that’s been added or changed since the latest daily backup. As a bonus, backups created through the Installatron are easy to restore with a single click. These manual backups can even be sent to an offsite location like Dropbox to save space.

To create a manual backup:

  • From your cPanel, click My Apps in the Applications section.
  • Click the checkbox to the far right of the application name (labeled 1 in the screenshot below).
  • Click “Backup” below the bottom of the application list (labeled 2 in the screenshot below).
  • On the next screen, enter a descriptive label and click Backup again. The backup will run with a status bar.

Neatline Plugin

Building an interactive map using Omeka’s Neatline plugin

Neatline is a plugin for Omeka that allows for the creation of interactive maps and timelines. Neatline allows the user to plot points on geospatial layers that, when clicked, reveal text and media. Users may create records from scratch and add them to their Neatline exhibits, or import existing items from Omeka. See Neatline.org for demos of this tool in action and more documentation.

Before using this tool, you’ll need to install the Neatline plugin to Omeka. If you’ve already installed the Escher plugin, you can use it to install Neatline. If not, follow the instructions on the “Installing Plugins” section of this support page.


Vocabulary

Item: Omeka’s basic building block, containing text, media, and/or metadata.
Collection: A group of items, typically sharing a common theme.
Record: Neatline’s version of items. Can be created on their own, or imported from an existing item in Omeka.
Exhibit: A Neatline map or timeline; contains your records.
Widget: An add-on tool for Neatline, such as Waypoints.
Spatial layer: A navigable map that Neatline can use, typically pulled from Google Maps. The various options Neatline offers have different aesthetics.


Setting up (first time only)

1. Install the Neatline plugin (see above). Install any additional supporting plugins you’d like, such as Neatline Waypoints.

2. Go to your Plugins page in Omeka. Then, click “Configure” to the right of Neatline. On the configuration page, click the link to developers.google.com/maps/web. If possible, open this link in a new tab, since you’ll soon need to return to the configuration page.

3. On the Google page that opens, click the “GET A KEY” button at top right. Follow the prompts in the pop-up window to create a new project, named whatever you’d like (this title won’t matter for your Neatline projects). When you’re given a long string of characters, copy it. This is your Google Maps API Key. You’ll only need it once.

4. Return to the Neatline configuration page from step 2. Paste your API Key into the text box. Then click the green “Save Changes” button. Neatline is now connected to Google Maps.

5. Click Settings at top right of your Omeka dashboard. In the text box to the right of “ImageMagick Directory Path,” enter this exact text without the quotation marks: “/usr/bin”. Then click the green Save Changes button at top right. This will allow Omeka to handle your images properly.

Neatline is now ready to go!


Laying the foundation

1. Optional: create one or more collections. This is an organizational tool: by creating collections now, you’ll be able to sort your items or bulk import them to Neatline more easily later. To create a collection, click “Collections” on your lefthand Omeka dashboard menu. Then, click the green Add a Collection button. On the Add a Collection page, give your collection a Title (you can leave all other boxes blank). If you want to add formatting to your text such as bolding or italics, check the box next to “Use HTML,” and more editing options will appear.

When you’re done, check the box next to “Public” and then click the green Add Collection button.

NOTE: You’ll see many fields when creating collections or items, but there’s no need to panic: almost all are optional and exist for archival purposes. Only fields with a * after them are required.

2. Begin creating items. Omeka is a tool for curating artifacts. In this step, you’ll begin this curation by creating items. To create an item, click “Items” on your lefthand Omeka dashboard menu. Then, click the green Add an Item button. On the Add an Item page, give your item a Title and a Description (you can leave all other boxes blank). This is the text that will ultimately appear to viewers of this record on your Neatline map. If you want to add formatting to your text such as bolding or italics, check the box next to “Use HTML,” and more editing options will appear.

Check the box next to “Public.” If you wish to add this item to a collection, select it from the dropdown menu under “Collection.”

If you wish to add images to your item, click the “Files” tab, then click “Choose File.” Follow the prompts to upload an image. To upload more images, click the green Add Another File button. These images will be displayed alongside your text when a viewer clicks the relevant point on your map.

If you wish to add tags to your item, click the “Tags” tab, then enter all desired tags in the text box, separated by commas. Remember to click Add Tag afterward.

When you’re done adding text, files, and tags, click the green Add Item (or Save Changes if you’re editing) button.

You can always find your list of items, with the option to edit each one, by clicking Items on your Omeka dashboard. From the Items page, you can also use the blue Search Items button to filter items by user or tag.

Clicking “Tags” on the Omeka dashboard will bring you to a list of all your tags. Click a tag’s name to edit it, or click the number to its left to view all items with that tag.


Managing Neatline exhibits and using the editor

1. Create an exhibit. Your Neatline map will be known as an exhibit. It’s now time to create this map. Click Neatline on the lefthand dashboard menu, which brings you to the Browse Exhibits page. Then click the green Create an Exhibit button.

On the Create an Exhibit page: give your exhibit a Title, Narrative (optional but recommended), and Widgets (if you’d like to use Waypoints or another add-on you’ve previously installed). The Narrative is the exhibit’s primary textual description, and it will appear alongside your map.

Scroll down and select a Default Spatial Layer from the drop-down menu. The Default Spatial Layer is the default map style your exhibit will display. You can edit this any time, so try out a few and see which aesthetic you like best. You can also optionally use the Embed Spatial Layers field to allow your viewers to toggle between various map styles.

The only other setting you need to change here (eventually) is Public: when you check this box, your exhibit will be live. When you’re done, click the green Save Exhibit button at the bottom of the form.

2. Access the Neatline editor. Return to the Browse Exhibits page from step 1. To access the editor, click your exhibit’s title. Clicking Public View or Fullscreen View will let you preview how your exhibit will look to visitors.

Here is what the editor looks like. Notice the Records, Styles, and Plugins tabs, and the list of records below the blue New Record button (there won’t be any records until you add some):

3. Set the default focus. This is the latitude/longitude and zoom that viewers will see when they first open your map (they’ll then be able to move it however they’d like). In the editor, click the Styles tab. Click and drag on your map to move it around, and use the + and – symbols at top left to zoom in and out. When you’re satisfied with the current view of the map, click the Use Current Viewport as Default button. This will automatically fill-in coordinates and the depth of zoom. You can also manually add these. When you’re done, click the blue Save button.

4. Import items into your exhibit, which then become records. First, click the Records tab in the editor. Then, click the large blue New Record button.

New tabs will appear. Click the Item tab. You’ll see a drop-down menu called “Search Omeka items.” This will list all the Omeka items you’ve previously created. Find the item you wish to add to the map and select it. The item’s content appears below the drop-down menu. If it looks correct, click the blue Save button. If not, click “View the item in Omeka,” edit the item, and try again.

NOTE: If you edit an item in Omeka that you’ve already imported into your Neatline exhibit, its record in the exhibit will be automatically updated.

NOTE #2: You can also create records from scratch using the New Record button and the Text tab (without making an Omeka item first). However, this isn’t recommended if you wish to include images or other media in your record, since that media would require additional HTML formatting.

5. Pin your records to the map. You can access any of your records from the list of records on the editor’s main page (see the screenshot in step 2 of this section, looking under the New Record button). Once you’re in a record, you can place it on the map. If you’ve just created a record using the Item tab from the previous step, then you’re already in that record.

Once in the record, click the Map tab. You can draw many different shapes here (and feel free to experiment!), but for our purposes, we’ll look at two buttons: “Navigate” and “Draw Point.”

When “Navigate” is selected, you can move your map around without adding anything. When “Draw Point” is selected, you can click on the map to place a blue pin. When a viewer clicks this pin, she’ll see the record associated with it. When you’re done, click Save.

For example: I have a record containing text and images about Shakespeare’s first performance of Henry V in London. I can go into my Henry V record and use “Draw Point” to place a pin on London. Now, the viewer can click the blue dot on London to bring up this record.

Optionally, you can use the Style tab in a record (to the right of the Map tab) to change the appearance of points and shapes for that record.

You can add as many interactive points or shapes as you’d like.

6. Add widgets to your record (optional). If you’re using the Waypoints widget, select it by clicking in the Widgets field. See the next step for more information about Waypoints.

When you’re done, click Save. Then, you can exit out of the record and back to the editor’s main page by clicking the X above the Style tab. You can return to Omeka by clicking “Return to Omeka.”

7. Adding Waypoints: a table of contents for your map. The following guide from Neatline.org explains how to add a list of clickable records to your map, so viewers can jump from point to point without searching the map for them:
http://docs.neatline.org/working-with-the-waypoints-plugin.html


Linking your maps to your Omeka home page

1. Choose what links you’d like to display on your home page’s navigation menu. This menu may appear in a slightly different place on your homepage depending on your theme. Here’s what it looks like in one of Omeka’s built-in themes (“Thanks, Roy”):

To edit this menu: from your Omeka dashboard, click Appearance in the black bar at the top of the screen. Then click the Navigation tab.

This takes you to a checklist of links. Each checked link will appear on your home page’s menu. To edit a link’s label (name) or URL, click the small black arrow to its right.

To add a new link: fill in the Label and URL fields at the bottom of this page, and then click Add Link. You can reorder the menu by clicking and dragging the links. When you’re done, click the green Save Changes button.

By default, there will be a link called “Neatline” which takes your viewer to a list of your Neatline exhibits. This is called the Browse Exhibits page, and looks like this:

If you’d rather have links on your menu to one or more specific exhibits, first pull up that exhibit’s public or full-screen view (see the screenshot for step 2 under Managing Neatline exhibits and using the editor above). Copy the URL from the address bar at the top of your browser. Paste it into the URL field on Appearance > Navigation, give it a label, click Add Link, and then Save Changes.

2. OR, choose a different default home page.

To use a list of your Neatline exhibits as your home page:
On Appearance > Navigation, click on the drop-down menu under “Select a Homepage” (to the right of the link checklist). Select “Neatline” (or whatever you’ve renamed it). Click Save Changes to finish.

To use a specific exhibit as your home page (taking your viewer directly to the map):
On Appearance > Navigation, add a link to the public or fullscreen view of the map you wish to be the homepage (see the previous step). Then, click on the drop-down menu under “Select a Homepage” (to the right of the link checklist). Select the link you’ve just added. Click Save Changes to finish.

Now you can share your Omeka site’s address with whomever you’d like, and they’ll be able to explore your interactive map!

Installing Grav

  1. Log into your cPanel:
    identikey login
  2. Navigate to Files > All Applications:
  3. Type Grav in the top right search bar and press Enter. Click Install this Application.
  4. Choose where you would like the domain to live. If you need further assistance on this section, read through our guide on Subdomains Vs. Subdirectories. You’ll also want to choose the latest software version, accept the license agreement, and choose your update preferences.
    Grav Install information
  5. Scroll down. Choose your Backup preferences. In the Settings section, name your Grav install, type in your contact details and create a username & password. Make sure that you’ve copied and pasted these credentials elsewhere, as you’ll need them later.
    Grav install username information
  6. Scroll down. Here you’ll have the option to install an empty version of the tool (i.e. a blank slate) or you can install a predefined package with themes/settings already customized for you. You’ll still be able to change settings in a predefined package, but it at least gives you a starting point. When you’re ready, click Install.
  7. You’ll now be redirected to a window where Grav will install.
  8. Once the install has completed, click on the middle admin link to log into your new Grav instance:
    grav app in app list
  9. Type the credentials that you set during the install process, and click Login.

Grav

Grav is a content management system (CMS) or, said another way, it’s an application to make websites. But differs from other CMSs like Drupal or WordPress in its underlying technology. While it’s a PHP app like those two, unlike them it does not have a database. All data is written directly to files rather than stored and retrieved from a database. This is known as a flat-file system and it can help with performance given numerous database calls can slow down sites.

Why and when would you use Grav? Grav should maybe be reserved for the technically-savvy user. It’s not that Grav is particularly difficult (every CMS has a learning curve) but rather it gets really interesting when you can integrate it into Github using the Github Sync plugin, which syncs everything on your Grav site to a Github repository for others to contribute to, clone, or fork. Grav also requires a familiarity with Markdown, a lightweight Markup language, so that’s something to be aware of as well.

You can learn more about Grav here.

Managing Permissions

The default Mediawiki installed has been customized to make it a bit harder for spammers to overwhelm wikis with illegitimate content and comments. This is done by modifying the LocalSettings.php file (a file that is included in every install in which it is possible to provide configurations details).

By default, Mediawiki allows anonymous users to create pages and edit pages in the wiki. The modifications change this in the following ways:

  • Anonymous users cannot edit existing pages
  • Anonymous users cannot create pages
  • Registered users must click the confirmation link in the registration email in order to edit or create pages

This approach should drastically reduce unsolicited content and comments on Mediawiki installations. One further step that administrator might take is to turn registration off after a predetermined amount of time. Users must create accounts by this date; after that, the settings are changed so that registrations are no longer open.

To add this setting, you must edit LocalSettings.php in your Mediawiki install:

  1. Login to cPanel and browse to your File Manager.
    searching in reclaim for file manager
  2. In the File Manager, browse to the folder within public_html that contains your Mediawiki install. If you installed the wiki at the root of your domain, you won’t need to go any further than public_html. If you installed the wiki in a subdomain or subdirectory, you’ll need to find the directory that is associated with that space.
  3. Locate LocalSettings.php. Once selecting the file, click download in the top menu bar to download the file as a backup before proceeding. Then click Edit in the top menu bar to edit the file.
  4.  Confirm that you want to edit the file.
    Confirm that you want to edit the file
  5. Browse to the bottom of the document, and locate the custom settings that were added during the Mediawiki install and the following line:
$wgGroupPermissions['*']['createaccount'] = false;

Installing Mediawiki

  1. To get started you’ll need to login to your control panel (https://buffscreate.net/dashboard/) using your BuffsCreate username and password.
    identikey login
  2. Once logged in you’ll be at the homepage of your control panel. Navigate the Applications section of the cPanel and click All Applications.
  3. Find and select MediaWiki.
  4. The next page gives you more information about the MediaWiki software. To begin the install, click install this application in the upper-righthand corner.
  5. On the next page, the installer will ask for some information about this install. The first thing you’ll want to do is decide where to install it. If you’re wanting to install MediaWiki on your main (the root) domain, you can leave the directory area empty. If you created a subdomain, you can select it from the drop-down menu. You also have the option of installing MediaWiki in a subfolder by typing in the folder name in the Directory field. Click here for more information about subdomains and subfolders.
    mediawiki install info page
    (By default the installer will automatically backup your MediaWiki website and update it anytime a new version comes out. While we recommend you keep this option, it is possible to only do minor updates, or turn them off completely. The installer will also create a database for you automatically, but if you’ve already created one for this website you can choose Let me manage the database settings and enter the details.)
  6. Finally, you’ll need to create an initial username and password for the MediaWiki install. Enter those credentials in the Settings section and click Install.
    change user settings mediawiki
  7. The installer will take just a few moments to install MediaWiki and a progress bar will keep you updated. When it is complete you will see a link to your new MediaWiki site as well as a link to the back-end administrative section for your MediaWiki site.
    wiki app in my apps
  8. Congratulations, you have now completed the installation of MediaWiki! You can now start to create collaborative documents on your own domain.

Creating a Book

To get started in Scalar, you will need to create a book.

  1. Go to your Scalar site via the My Apps link or the Scalar URL you established during the setup process.
    Access Scalar site and click the Sign-in link
  2. Log in to Scalar using the username and password you set up during the installation process.
    log into scalar with your email and Scalar password
  3. Go to the top right corner and click, Dashboard.
    Scalar landing page and dashboard link
  4. Select the My Account tab and at the bottom of the page type in a title for your book. This can be changed at a later time if needed. Click Create.
    Scalar Book Creation
  5. You now see your book in the “My books” list. From there you will be able to build your Scalar book.

Scalar book example