Accessing Your Files through the File Manager

Your BuffsCreate cPanel includes a File Manager that allows you to interact directly with the files stored in your web hosting account. This can be useful if you want to upload software that cannot be automatically installed via the Web Applications section of your cPanel, if you need to change the name or permissions of a file or group or files, or if you want to edit a plain text file. To access your files via the File Manager, use these steps:

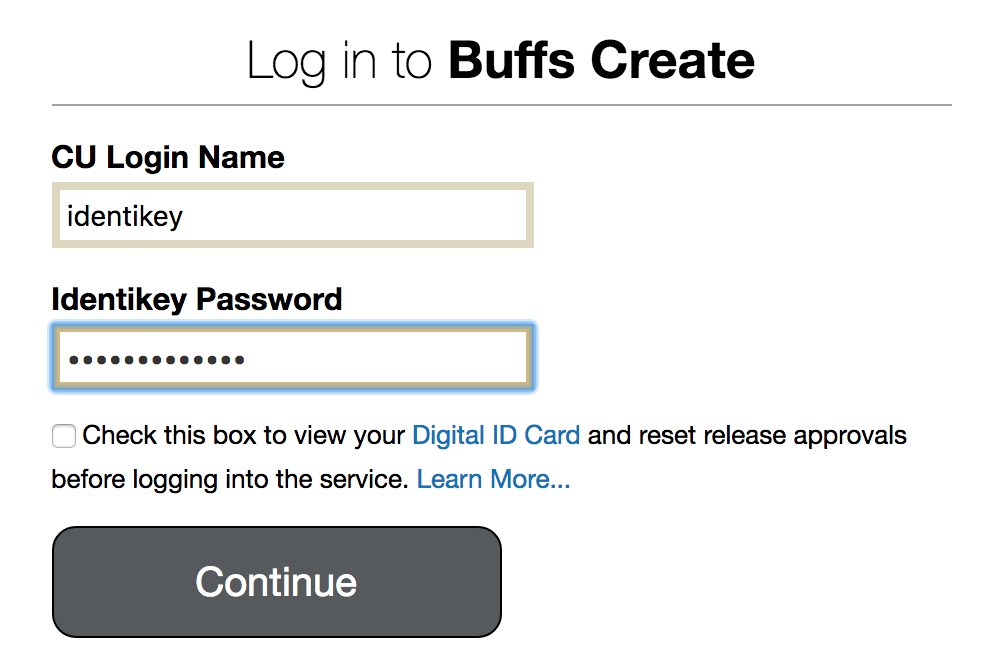
  1. Login to buffscreate.net/dashboard with your Identikey username and password.
    identikey login
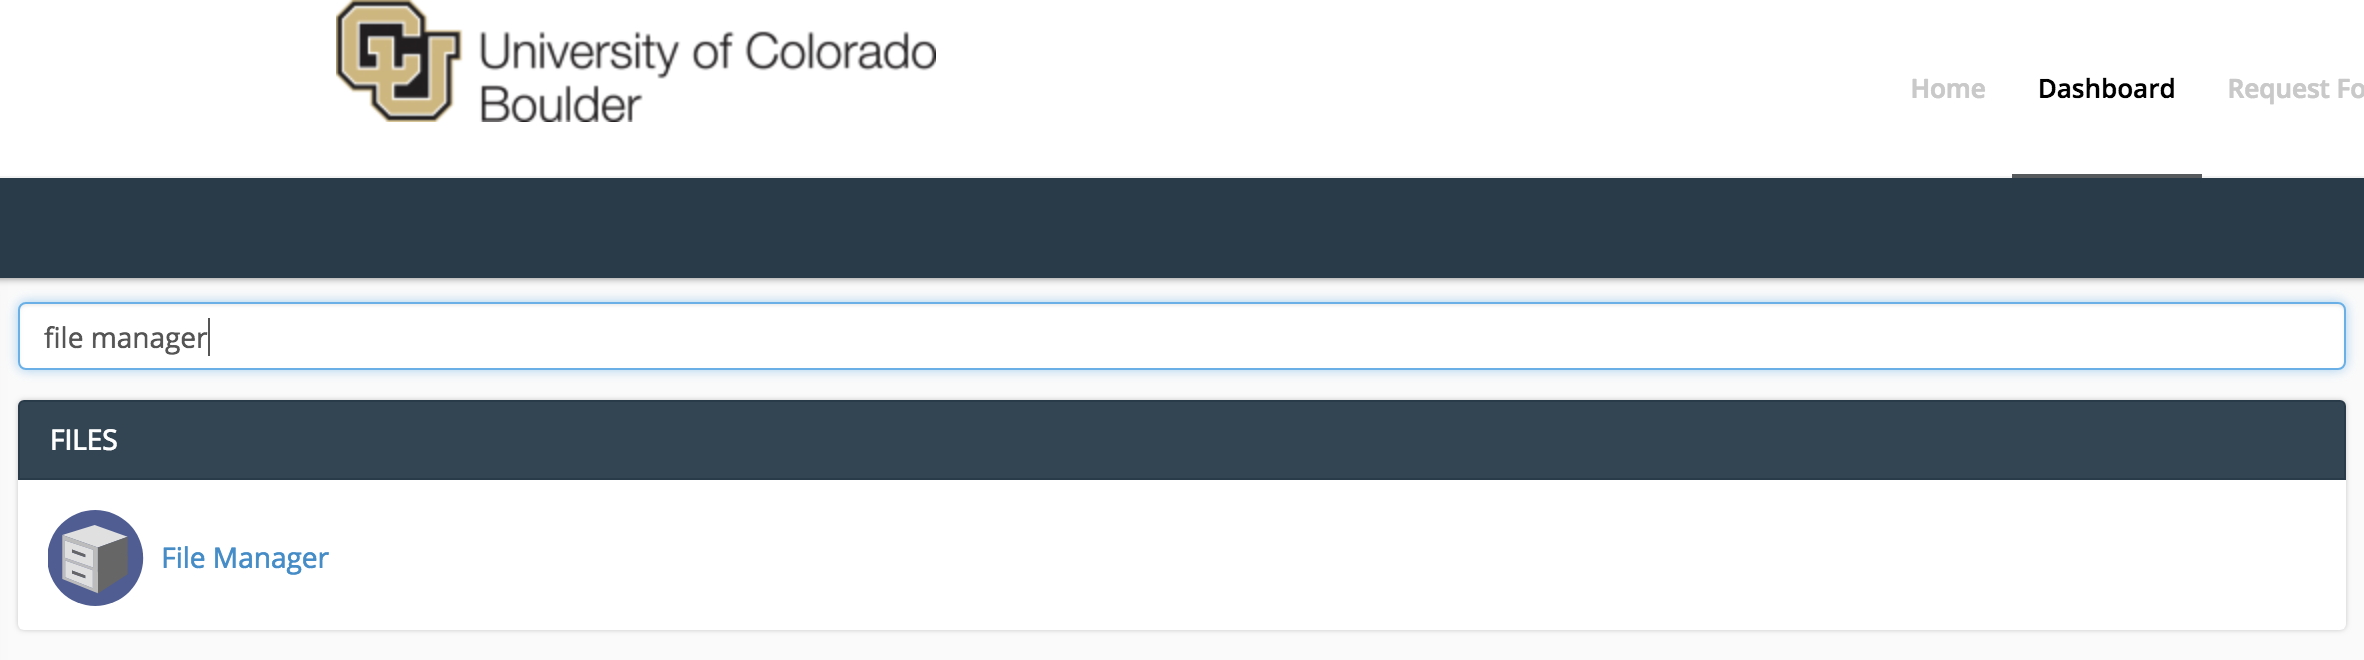
  2. Once logged in, you’ll be on the homepage of your cPanel. The easiest way to navigate your cPanel is by utilizing the search bar in the top right panel. Search File Manager. When you press enter, you will be automatically redirected to the File Manager.  You can also find the File Manager icon under the Files section.
    searching in reclaim for file manager
  3. On the left side of the “File Manager” window, you’ll see a navigation menu containing the file structure of your web hosting account. More information about the contents of these files and folders can be found in the File Structures and the File Manager documentation article.
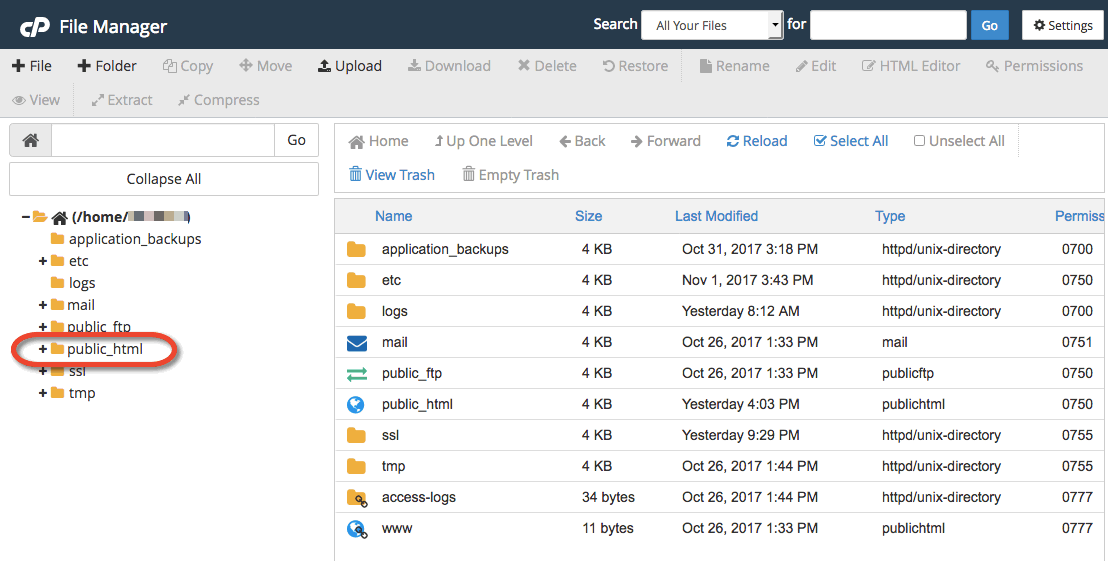
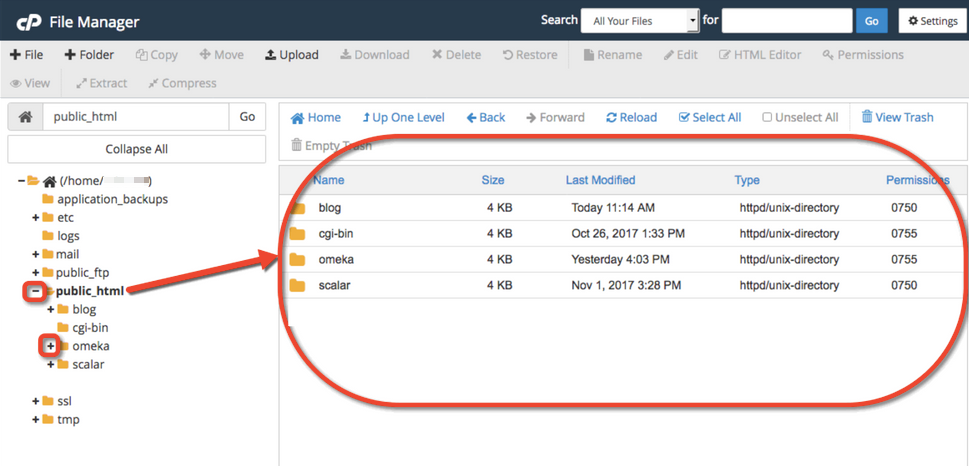
  4. In the navigation menu, choose the public_html directory. This will take you directly to the folder that contains the files associated with your website(s). You’ll notice your current location (the public_html folder) is bolded and highlighted in this menu. Click the [+] (expand) icon next to a folder to see what subfolders it contains, or click on the name of the folder to view all of its contents in the file browser on the right side of the page. You can also navigate through the folders in your account by double-clicking on them in the menu on the left side of your file manager.
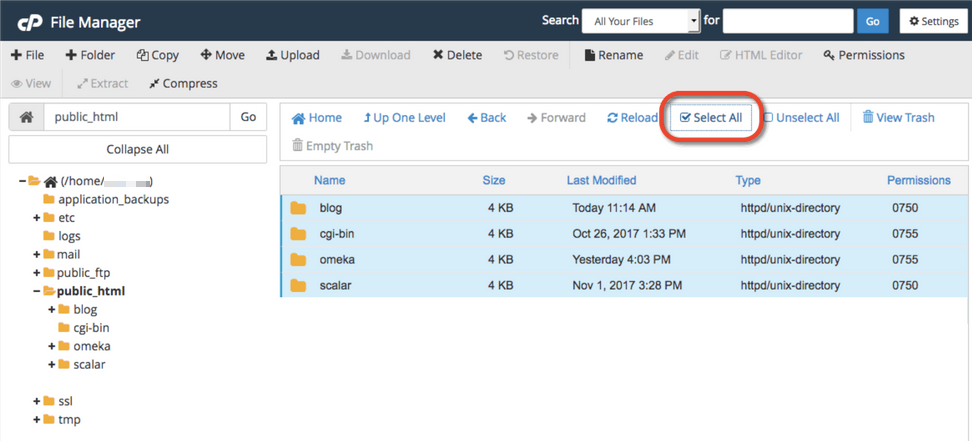
  5. To select an item, click once on its icon in the file browser. You can also use the “Select All” button above the file browser, or your computer’s keyboard shortcuts (Shift, Command, Control, etc), to select multiple items from this list.
  6. Depending on what you have selected, different options will be available to you in the action menu across the top of your file manager. For example, if you have selected a folder, you can rename it or Change Permissions on it.
    screen shot of file manager tools
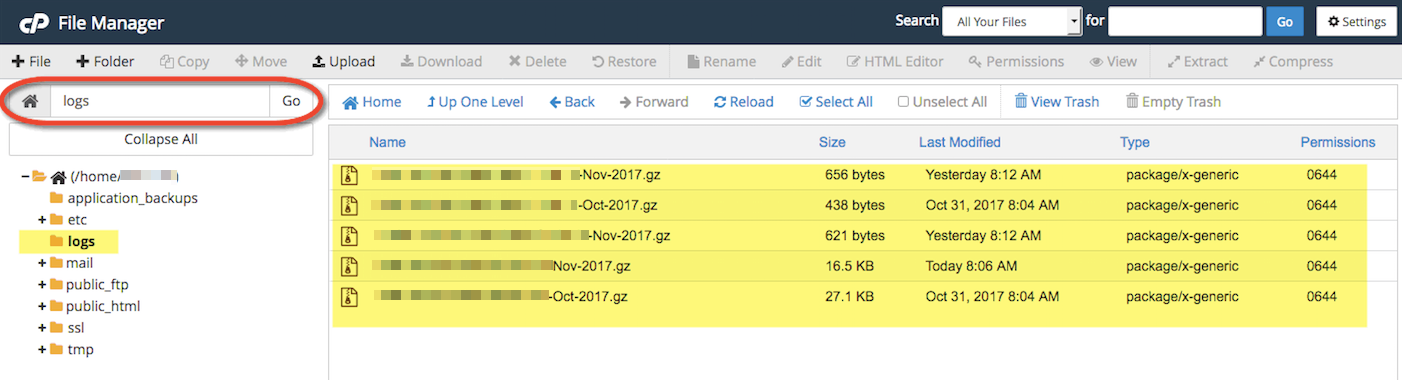
  7. If you know exactly what location you want to skip to within your web hosting account, you can type it into the box directly above the navigation menu and click Go.
  8. Alternatively, if you know the exact name of the file or folder you are looking for, but not its location, you can use the Search box to find it.screen shot to find file by name

Omeka

Omeka is an open-source web application that can be used to create and display online digital collections. Developed by programmers at George Mason University, Omeka was designed to be user-friendly, both during installation and setup and during daily usage.

You can learn how to use this application in the official Omeka Support Documentation. This support guide will help you get started and begin creating your Omeka site.

Mediawiki

MediaWiki is an open-source publishing platform that can be used for creating a collaborative document repository. It’s the software that drives the Wikipedia website.

You can learn how to use this application at the official MediaWiki Help Pages. This support documentation wiki will show you how to manage all aspects of your wiki, including customizing its appearance, editing content, and changing user settings.

WordPress

WordPress is an online, open source blog application. Powering over 30% of the web, WordPress is easily one of the most popular content management systems (CMS) in existence today. WordPress forked from b2/cafelog in 2003, and WordPress MU multiple website functionality has been integrated since 2010. You can read more about the WordPress backstory here.


Map Your Domain to Blogger

Mapping your domain is an important part of buffscreate.net; it reinforces the idea that you don’t necessarily need to host all your own applications. You should, however, be mindful of making your web presences part of a domain you control. If you would like to map a subdomain and have not yet created it, use this tutorial on creating subdomains before proceeding. To map your domain, or a subdomain, to Blogger, use these steps:

  1. Log in and navigate to your cPanel. Click the Search box at the top, right-hand corner and type “DNS” (without the quotes).
  2. Click on the Zone Editor icon.
  3. Find the domain (or subdomain) you want to map to Blogger in the list and click Manage.
  4. Create a new CNAME record by clicking Add Record. To save, click Add Record.Keep this window open; you will need it in later steps.
  5. In a new window, go to the Blogger website, and login with your Blogger/Google username and password.
  6. From your Blogger Dashboard, find the blog you’d like to use, expand the More Options menu, and click Settings.
  7. On the “Basic Settings” page, find the Publishing section, and click the Setup a 3rd party URL for your blog link.
  8. Under Advanced Settings, type the full subdomain or domain you are mapping into the box, leave the Use missing files host? option set to No, then click Save.
  9. You will be presented with a message that your domain cannot be verified, along with information about your existing DNS entry, and an additional DNS entry that needs to be made. This is normal. Copy the second entry under the Name, Label, or Host entry to your clipboard.
  10. Go back to the window or tab containing the Zone Editor in your BuffsCreate cPanel. Create another records by clicking Add a Record. Paste the text you just copied into the Name field. This information will be different for each domain. Set the TTL field to 14400, and the Type drop-down menu to CNAME
  11. Go back to the window or tab containing the Blogger Advanced settings panel, and copy the second entry under the Destination, Target, or Points to column to your clipboard.
  12. Go back to the window or tab containing the Advanced DNS Zone Editor in your buffscreate.net cPanel. In the Zone File Records section, find the domain you were editing Action for and paste the text you just copied into the CNAME field. This information will be different for each domain. Click Add record when you are done.
  13. Return to the window or tab containing the Blogger Advanced settings panel, and click Save.
  14. If everything was successful, your domain will now appear as the Blog Address. Keep in mind that it may take up to 72 hours for your domain or subdomain to correctly point all visitors to the correct location.

For further instructions, click here.

Map Your Domain to Tumblr

Mapping your domain is an important part of buffscreate.net; it reinforces the idea that you don’t necessarily need to host all your own applications. You should, however, be mindful of making your web presences part of a domain you control. If you would like to map a subdomain and have not yet created it, use this tutorial on creating subdomains before proceeding. To map your domain, or a subdomain, to Tumblr, use these steps:

  1. Log in and navigate to your cPanel. Click the Search box at the top, right-hand corner and type “DNS” (without the quotes). As you type, the cPanel page will begin to narrow down results.
  2. Find and click on Zone Editor to continue.
  3. Find the domain, or subdomain, you want to map to Tumblr in the list of Zone File Records. Click Manage next to the proper domain.
  4. Leave the Name, and TTL fields set to their defaults. Update the Type drop-down menu to CNAME, and the Address field to domains.tumblr.com. Click Edit Record when you are done.
  5. Visit the Tumblr website, and login with your Tumblr username and password.
  6. After logging in, click the Tumblr Settings icon.
  7. For the Tumblog you’d like to use under the Username click the pencil icon to edit these settings.
  8. Check the Use a custom domain checkbox. Type the name of the domain or subdomain you want to map to Tumblr into the box, then click Test your domain.
  9. If your domain mapping was successful, you’ll see a message that your domain is now pointing to Tumblr. Click the Save button before leaving the page. Keep in mind that it may take up to 72 hours for your domain or subdomain to correctly point all visitors to the correct location.

What is Domain Mapping?

Domain mapping, simply put, is deciding where visitors should be directed when they visit various pieces of your website. Domains and subdomains can be mapped directly to folders located within your webhosting account, where you may have installed WordPress, Omeka, MediaWiki, or other web applications. Domains and subdomains can also be mapped to some third-party providers.

What is DNS?

Remember back before everyone had computers that fit in their pocket, how companies would ship a book full of phone numbers to your doorstep? We might have known who we were looking for, but we needed to look up phone numbers unless they were your crazy relatives that you learned to memorize. When you get your own domain name, by default it’s nothing more than a shortcut, an address, or (to fit this very imperfect analogy) a phone number. When you type a domain name into the address bar of your browser, someone has to identify it and tell it what to display. That’s where a name server comes in.

A name server is a computer, running as a server, that keeps a record of all the domain names that are associated with it and keeps track of where those domains should go. In the case of buffscreate.net, the nameserver is the same computer that runs the hosting. You can peek under the hood and see this in action by going to the Websites and Domains tab of your cPanel account and clicking on DNS Settings. DNS stands for Domain Name System and the name server on buffscreate.net gives control to it to identify what should be displayed when someone types in your domain. Consider the fact that you might have one or more subdomains in your account. The name server and DNS are able to identify those subdomains and let the world wide web know that they exist and point to some files/folders on a computer somewhere.

When you signed up for a domain through the buffscreate.net system your nameservers were chosen for you. So when people type in your address, the server responds with information about your account. When you migrate an account away from one hosting platform like buffscreate.net and onto a new service, it will require you to change the nameservers so that your domain name points to a new server with its own files and structure. It’s also possible to have subdomains that point to entirely different servers than buffscreate.net. For example, you could have a subdomain that looks to Tumblr for files.